
Applicant User Manual
How to apply for a faculty position at ABV-IIITM Gwalior, from creating your account to submitting your application. You do not need to finish in one sitting — the portal saves your work as you go, and you can return to it as often as you like until you submit.
1. Before you start
Set aside about an hour for your first session, and have these ready as files on your computer.
| What you will need | Accepted formats | Size limit |
|---|---|---|
| A recent photograph | JPG, JPEG, PNG | 300 KB |
| Your signature (scanned or photographed) | JPG, JPEG, PNG | 200 KB |
| Aadhaar card | PDF, JPG, JPEG, PNG | 512 KB |
| Degree certificates and mark sheets | PDF, JPG, JPEG, PNG | 512 KB each |
| Experience certificates | PDF, JPG, JPEG, PNG | 512 KB each |
| Category certificate, if you are claiming one | PDF, JPG, JPEG, PNG | 512 KB |
| Proof of your fee payment | PDF, JPG, JPEG, PNG | 512 KB |
512 KB is the limit for almost every upload, and a few appendices are stricter still — the photograph and the signature among them. Each upload control states its own limit underneath. A scan at 150–200 dpi in black and white is usually well within it; a photograph straight from a phone camera usually is not, so reduce it before you upload.
You will also need:
- An email address you check regularly. Everything about your application is sent there.
- Details of three referees — name, designation, organisation, email and mobile number.
- Your bank transfer details, once you have paid the fee.
A tip that saves time later. Scan your certificates before you begin and
give the files obvious names, such as PhD-degree.pdf. You will be asked for
around twenty documents, and hunting for them one at a time is the slowest part of the process.
2. Create your account
Go to the portal and choose Create an account. You need one account only — you can apply for several posts from it.
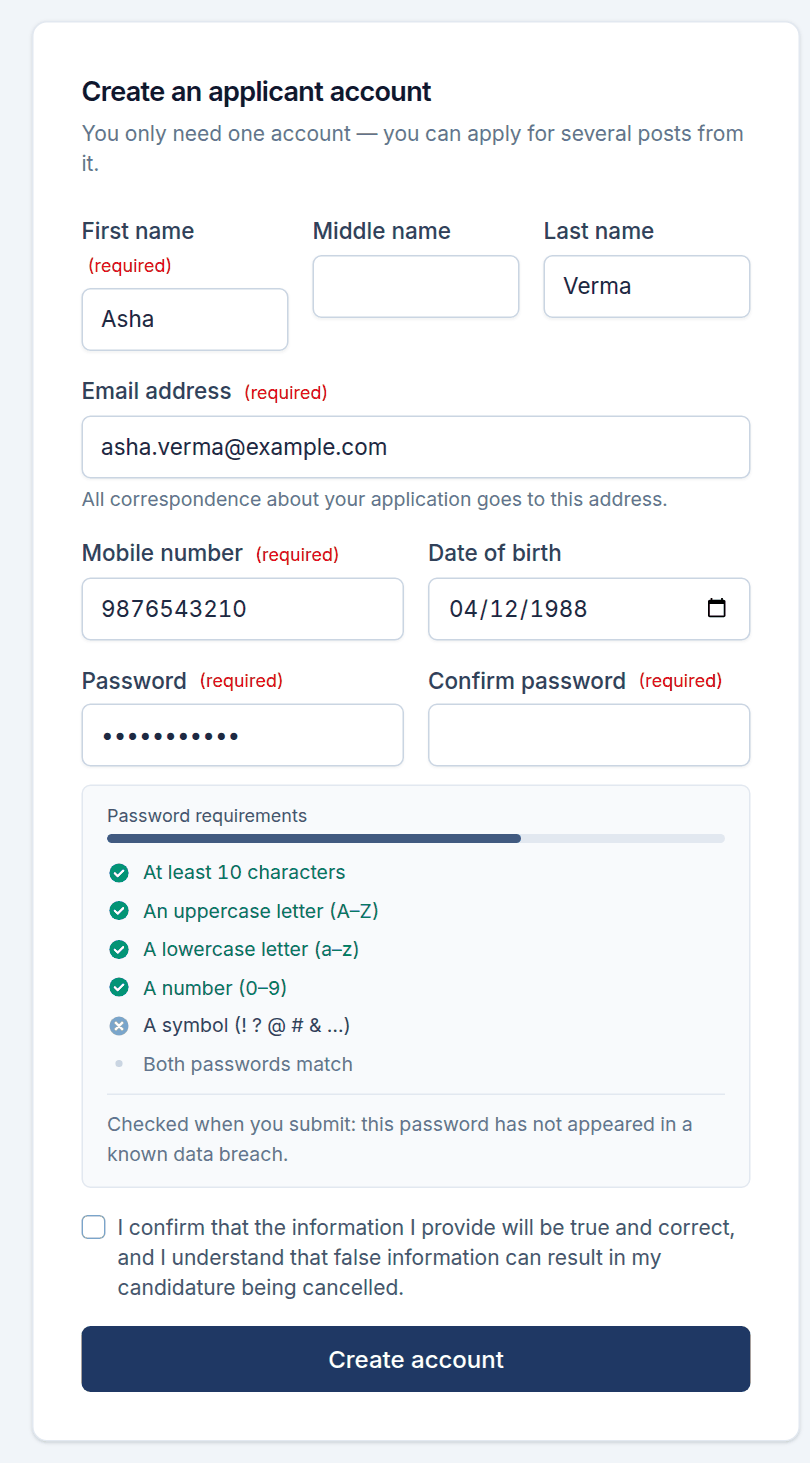
Your password must have:
- at least 10 characters;
- an uppercase letter and a lowercase letter;
- a number;
- a symbol, such as
! ? @ # &.
The panel below the field ticks each rule off as you type, and tells you when the two password fields match. One more check runs when you submit rather than as you type: the password must not be one that has appeared in a known data breach. If it has, choose another.
When you submit the form, the portal emails you a verification link. Open that email and click the link before signing in. If it does not arrive within a few minutes, check your spam folder.
3. Sign in
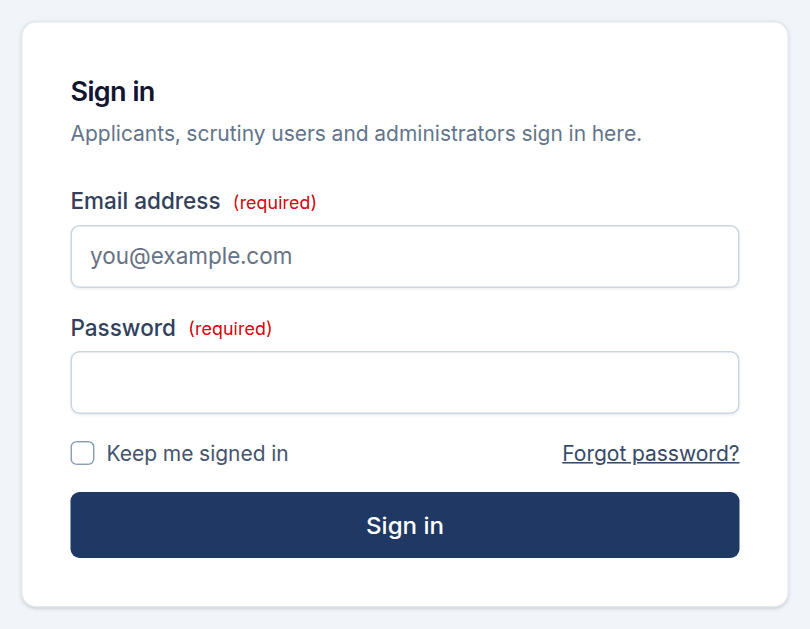
Enter the email address and password you registered with. If you have forgotten your password, choose Forgot password? and the portal will email you a link to set a new one.
↑ Back to top4. Choose the post and start your application
After signing in you arrive at your dashboard. It shows what is open, what you have started, and what you have submitted.
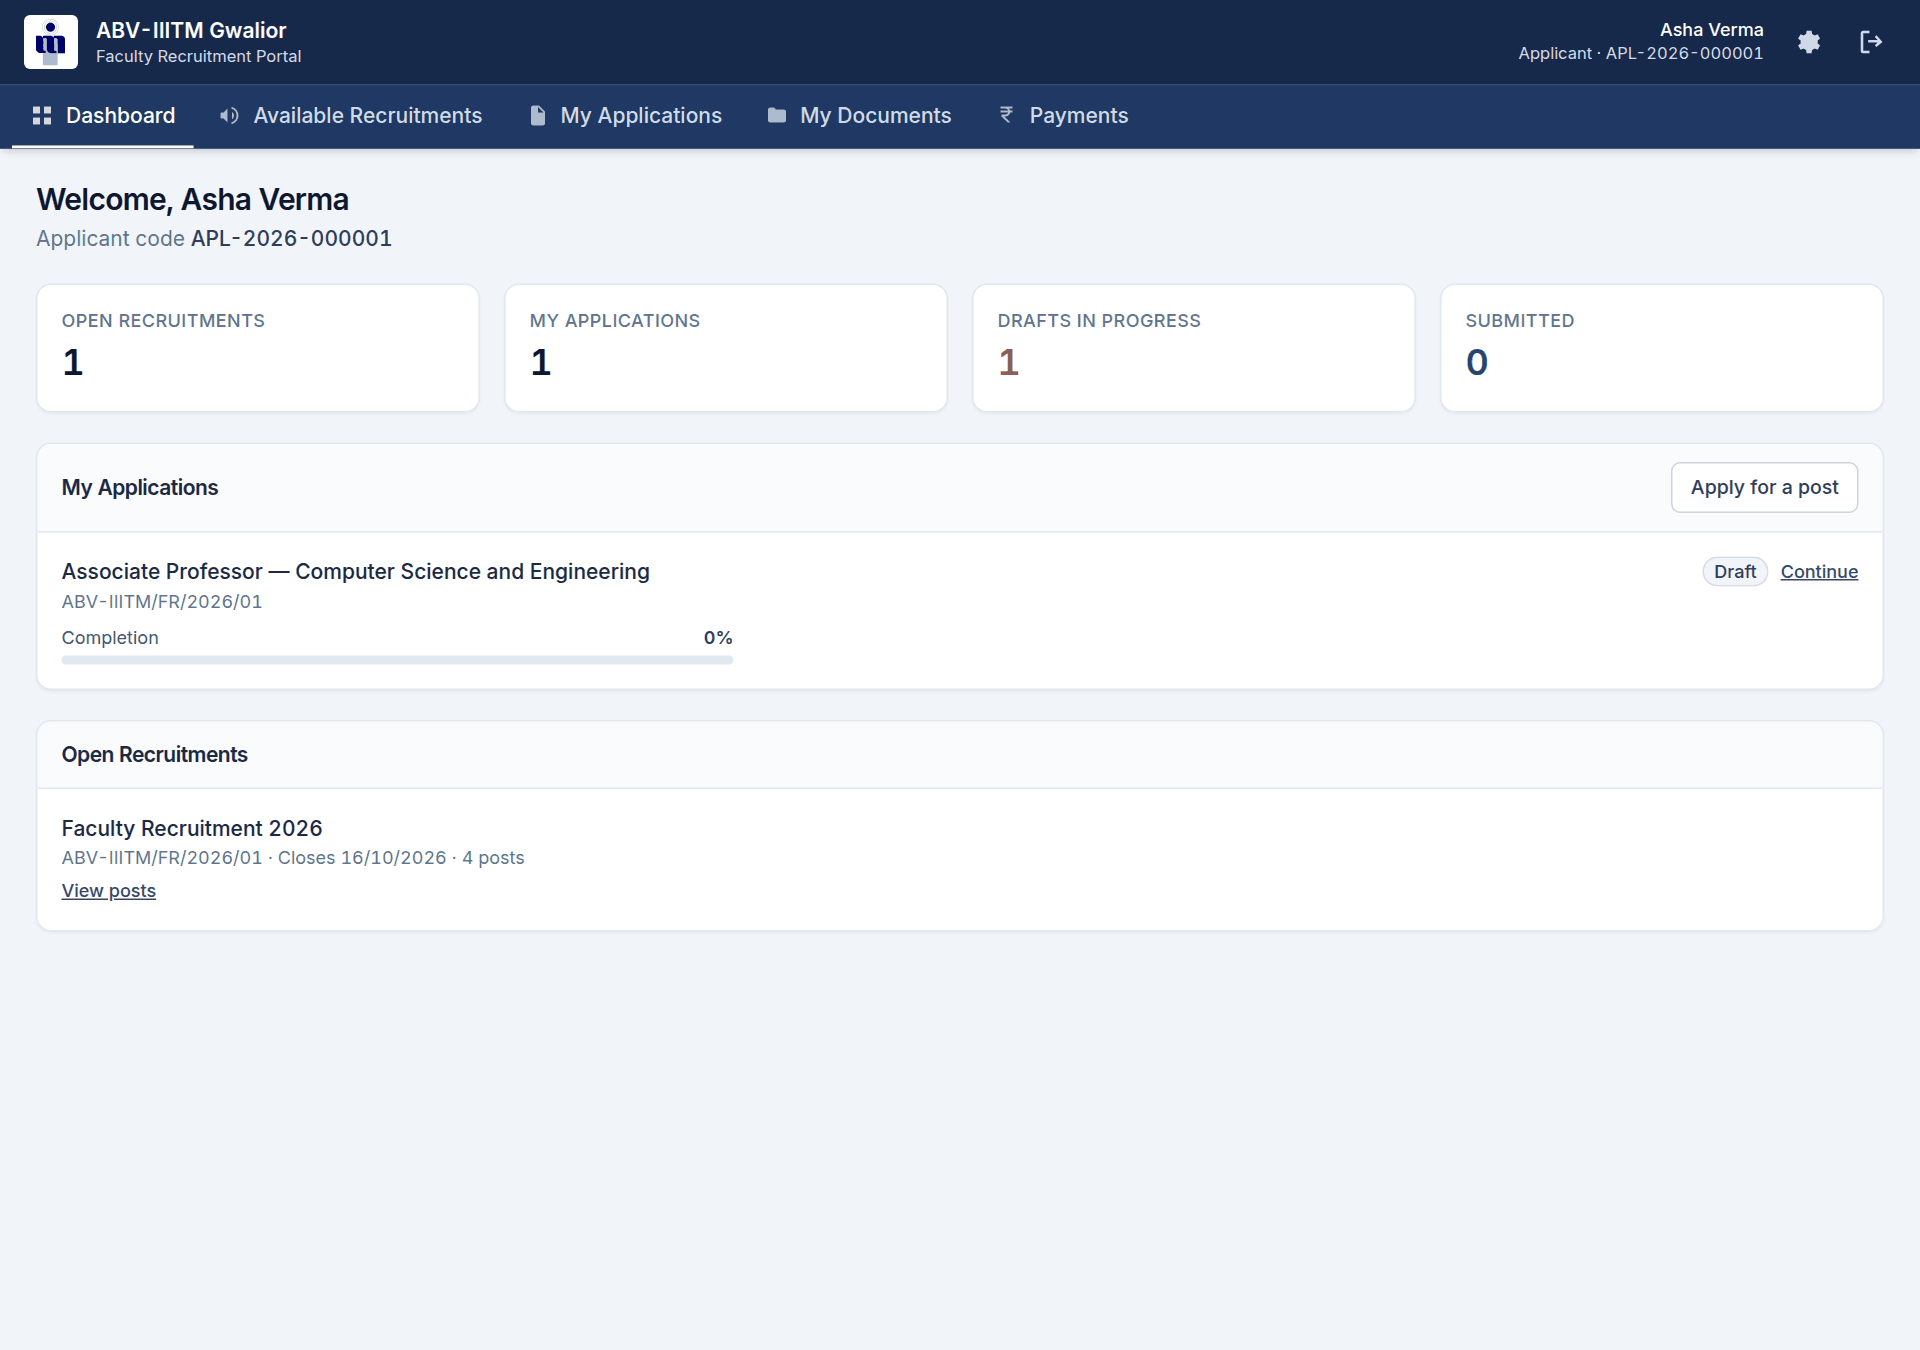
Choose Available Recruitments to see the posts currently advertised.
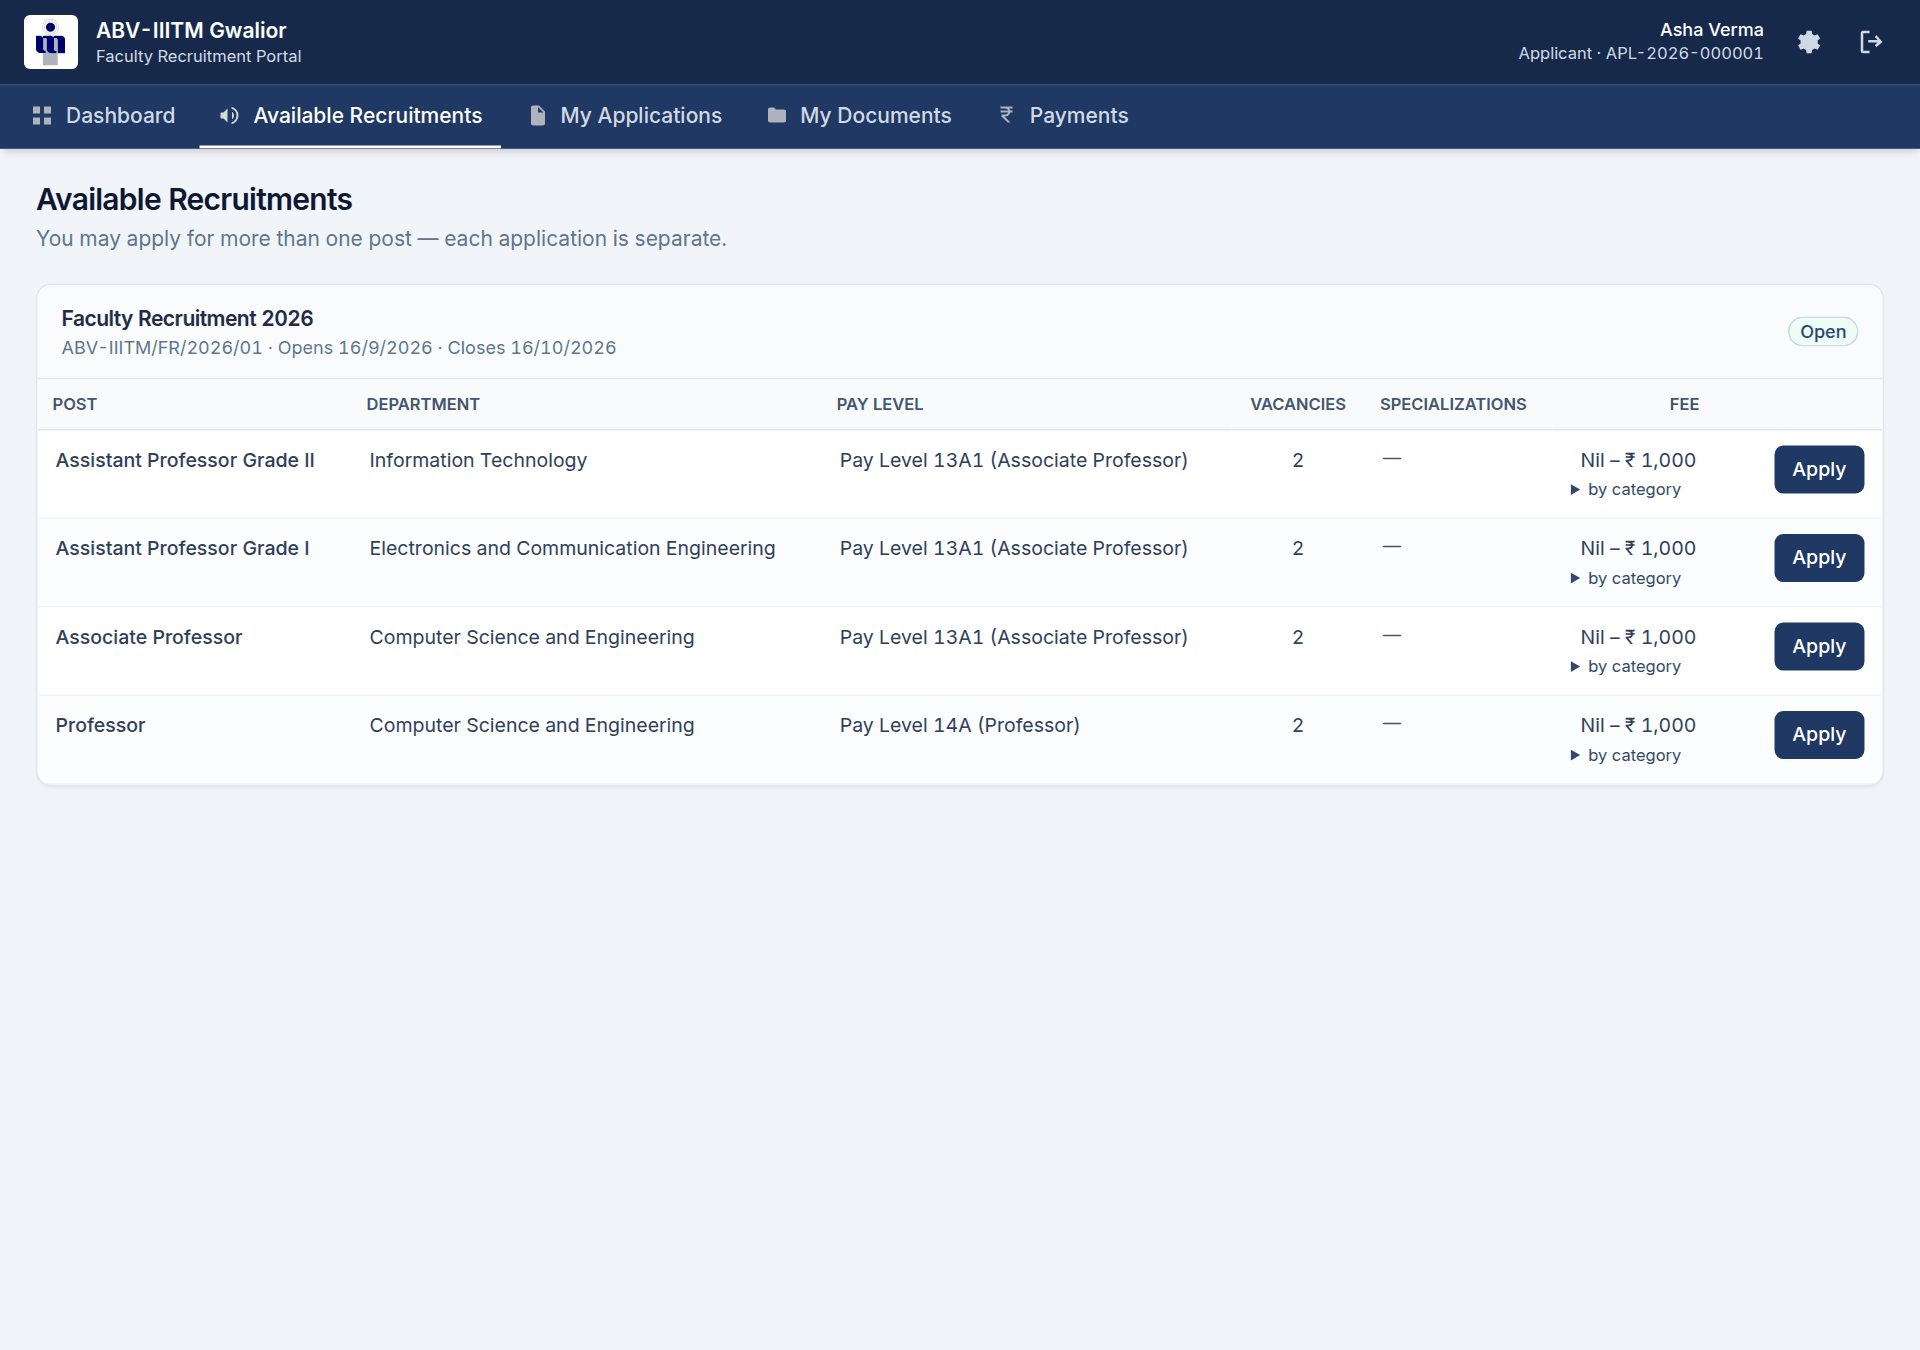
About the fee column. The fee depends on your category. Where the amounts differ, the column shows a range — choose by category to see the exact amount for each. If more than one concession applies to you, you pay the lower of them.
When you have found the post you want, choose Apply. The portal creates your application and opens the form at the first step.
You may apply for more than one post. Each application is separate and is filled in on its own, and the fee applies to each.
5. How the form works
The form has 22 steps, listed down the left-hand side. You can work through them in order or jump to any step you like.
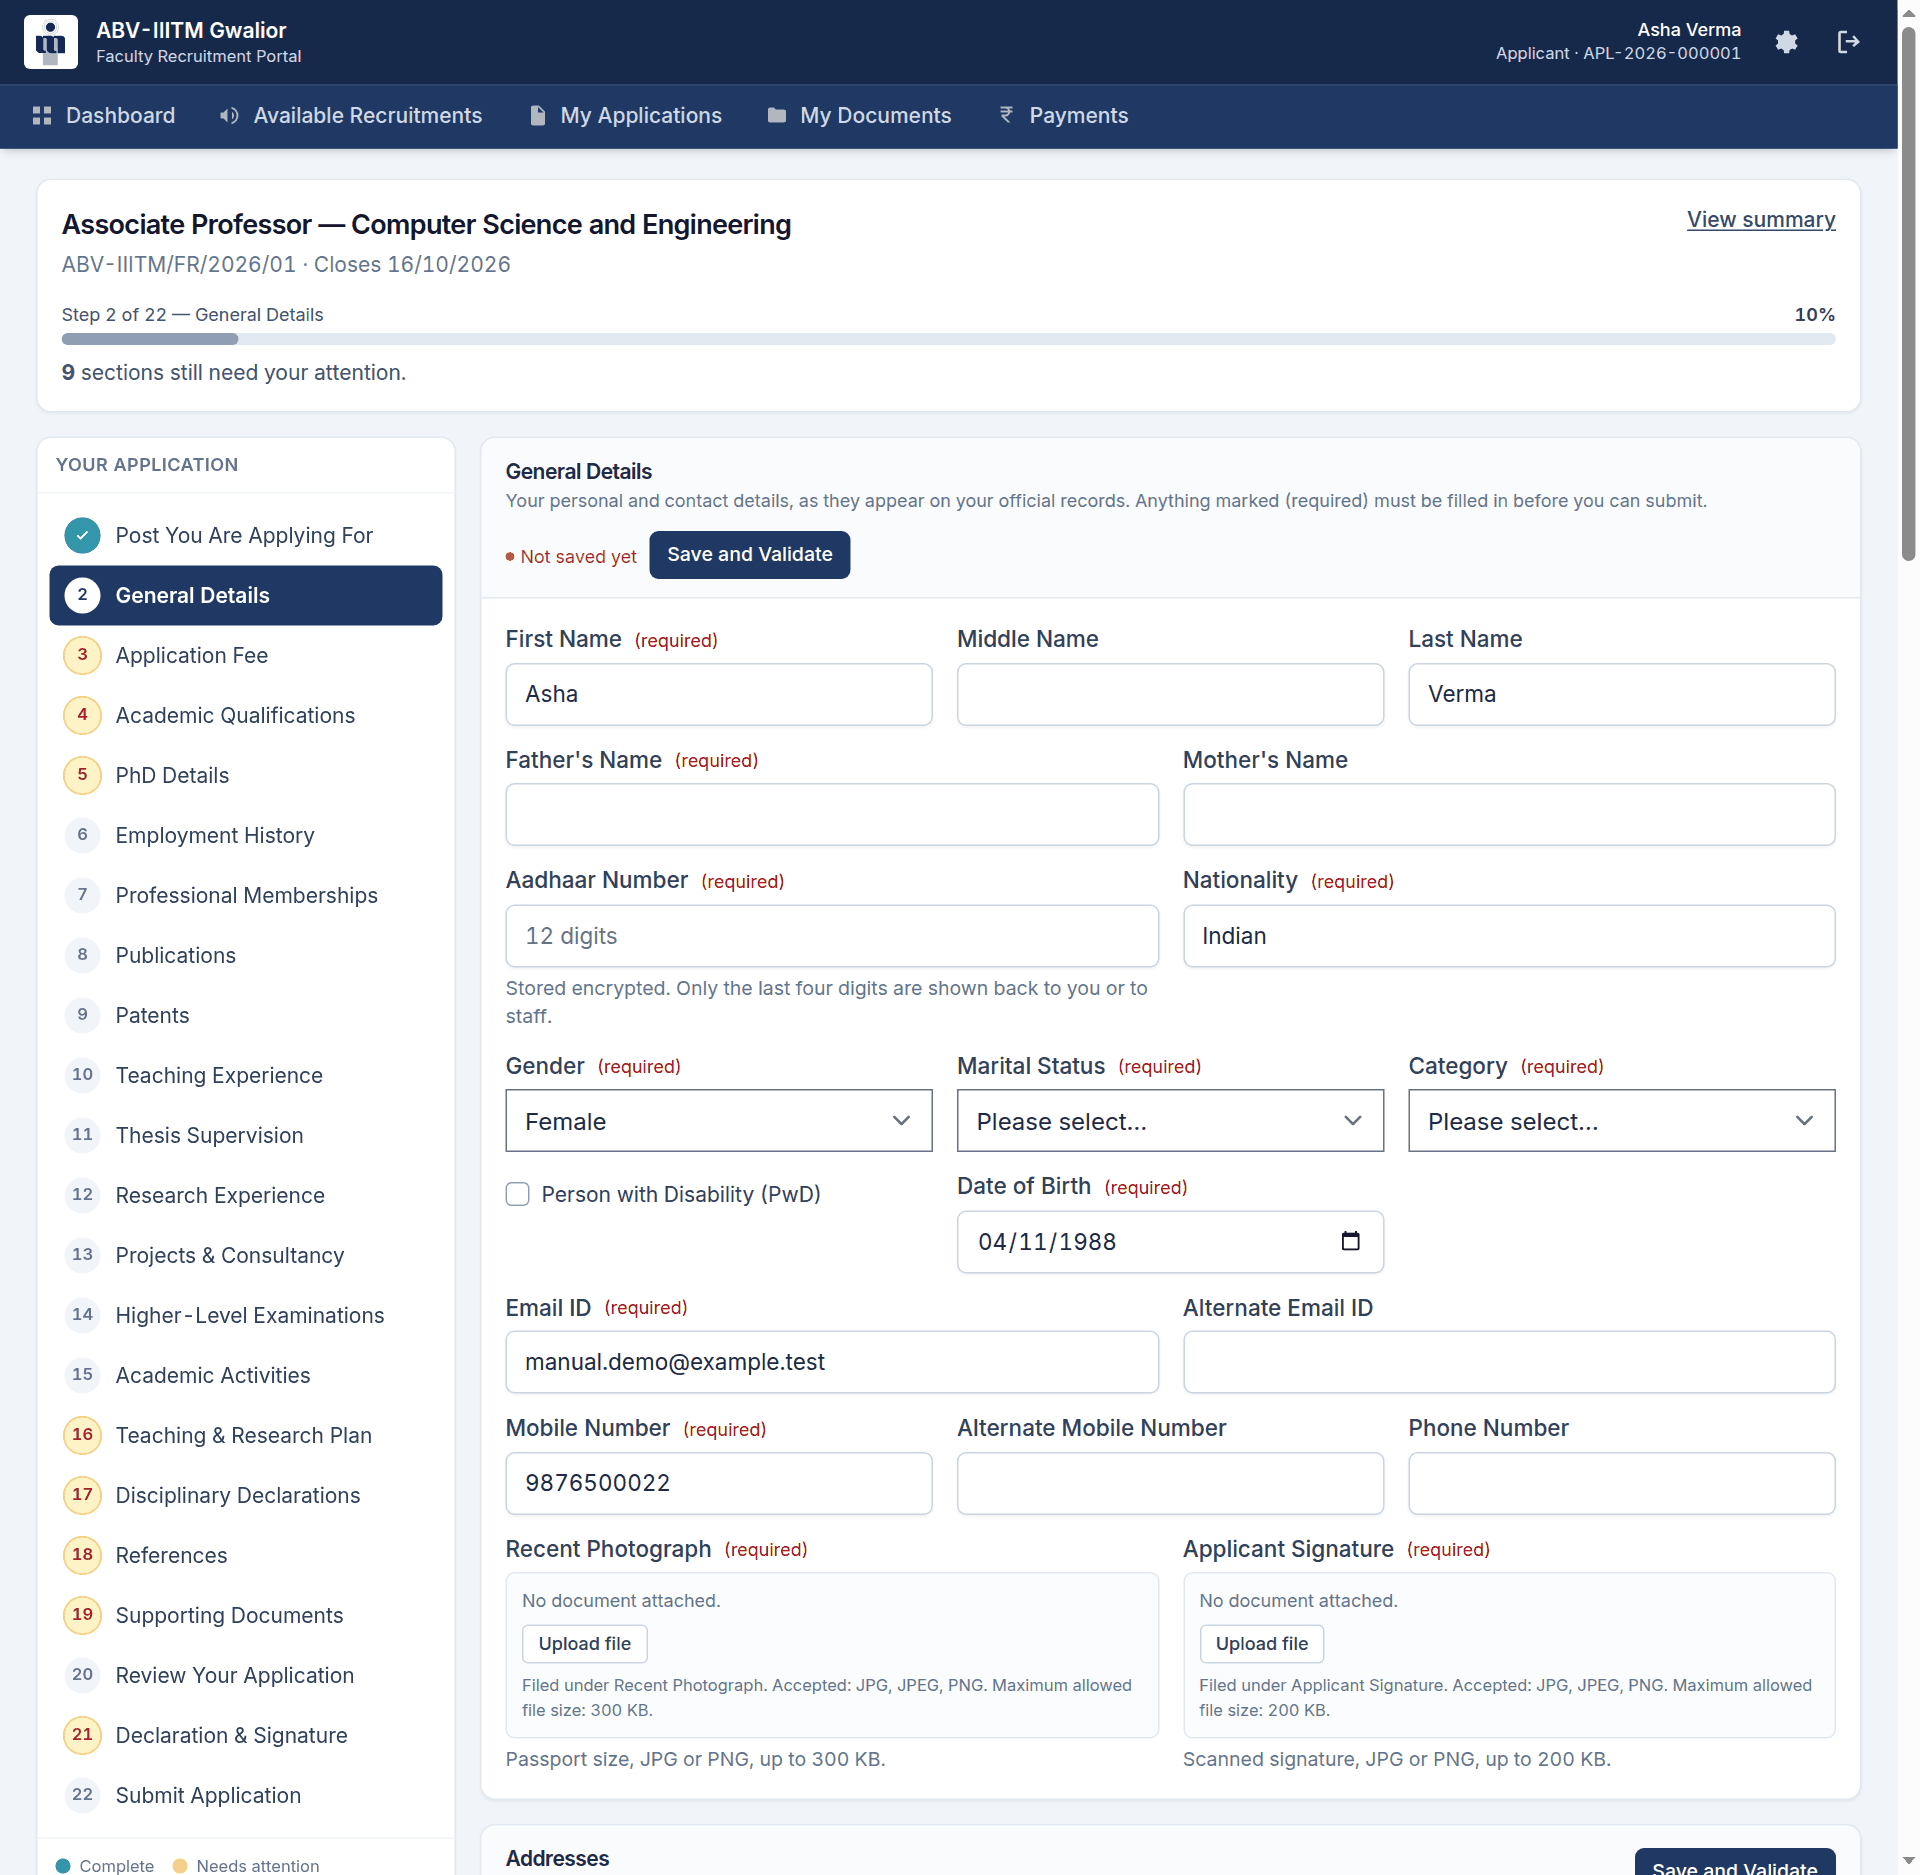
Reading the step list
Each step carries a mark showing where it stands:
| Mark | Meaning |
|---|---|
| ✓ | This step is complete |
| 4 | Started, but something is still needed |
| 9 | You have not filled this step in yet |
The same key appears underneath the step list in the portal, so you never have to remember it.
Above the step list, a line reads Step 5 of 22 — PhD Details and shows how complete your application is. Underneath it, 9 sections still need your attention links straight to the first one.
Two buttons, two jobs
- Save and Validate, at the top right of a section, stores what you have entered and checks it straight away. The line beside it tells you where things stand — Not saved yet, Saving…, or Saved at 10:42.
- Next, at the bottom of the page, saves what you have entered and then takes you on, naming the step you are going to. If something on the page still needs fixing, you stay where you are and the problem is described — nothing you typed is lost.
Your work is saved as you go
Sections save automatically, and the portal also saves whatever you have typed when you move to another step or leave the form. You can close the tab and come back another day.
Required and optional
Fields marked (required) must be filled in before you can submit. Everything else is optional.
Empty sections are allowed. If a section does not apply to you — you have no patents, say — leave it empty and carry on. The checklist marks it Not applicable and you will not be stopped from submitting. Four steps are the exception, and every applicant must complete them: General Details, Academic Qualifications, PhD Details and the Disciplinary Declarations.
↑ Back to top6. Step 2 — General details
This is your name, date of birth, category, contact details and addresses, exactly as they appear on your official records.
- Your Aadhaar number is stored encrypted. Only the last four digits are ever shown back to you or to the recruitment cell.
- Your category determines your fee, which is why this step comes before the payment step. If you claim any category other than General, a Category Certificate upload appears beside the dropdown and is required.
- Specialisations. Choose at least one from the list for the department you are applying to. If yours is not listed, choose Other and type it.
- A recent photograph and your signature are uploaded here, and both are required.
Addresses
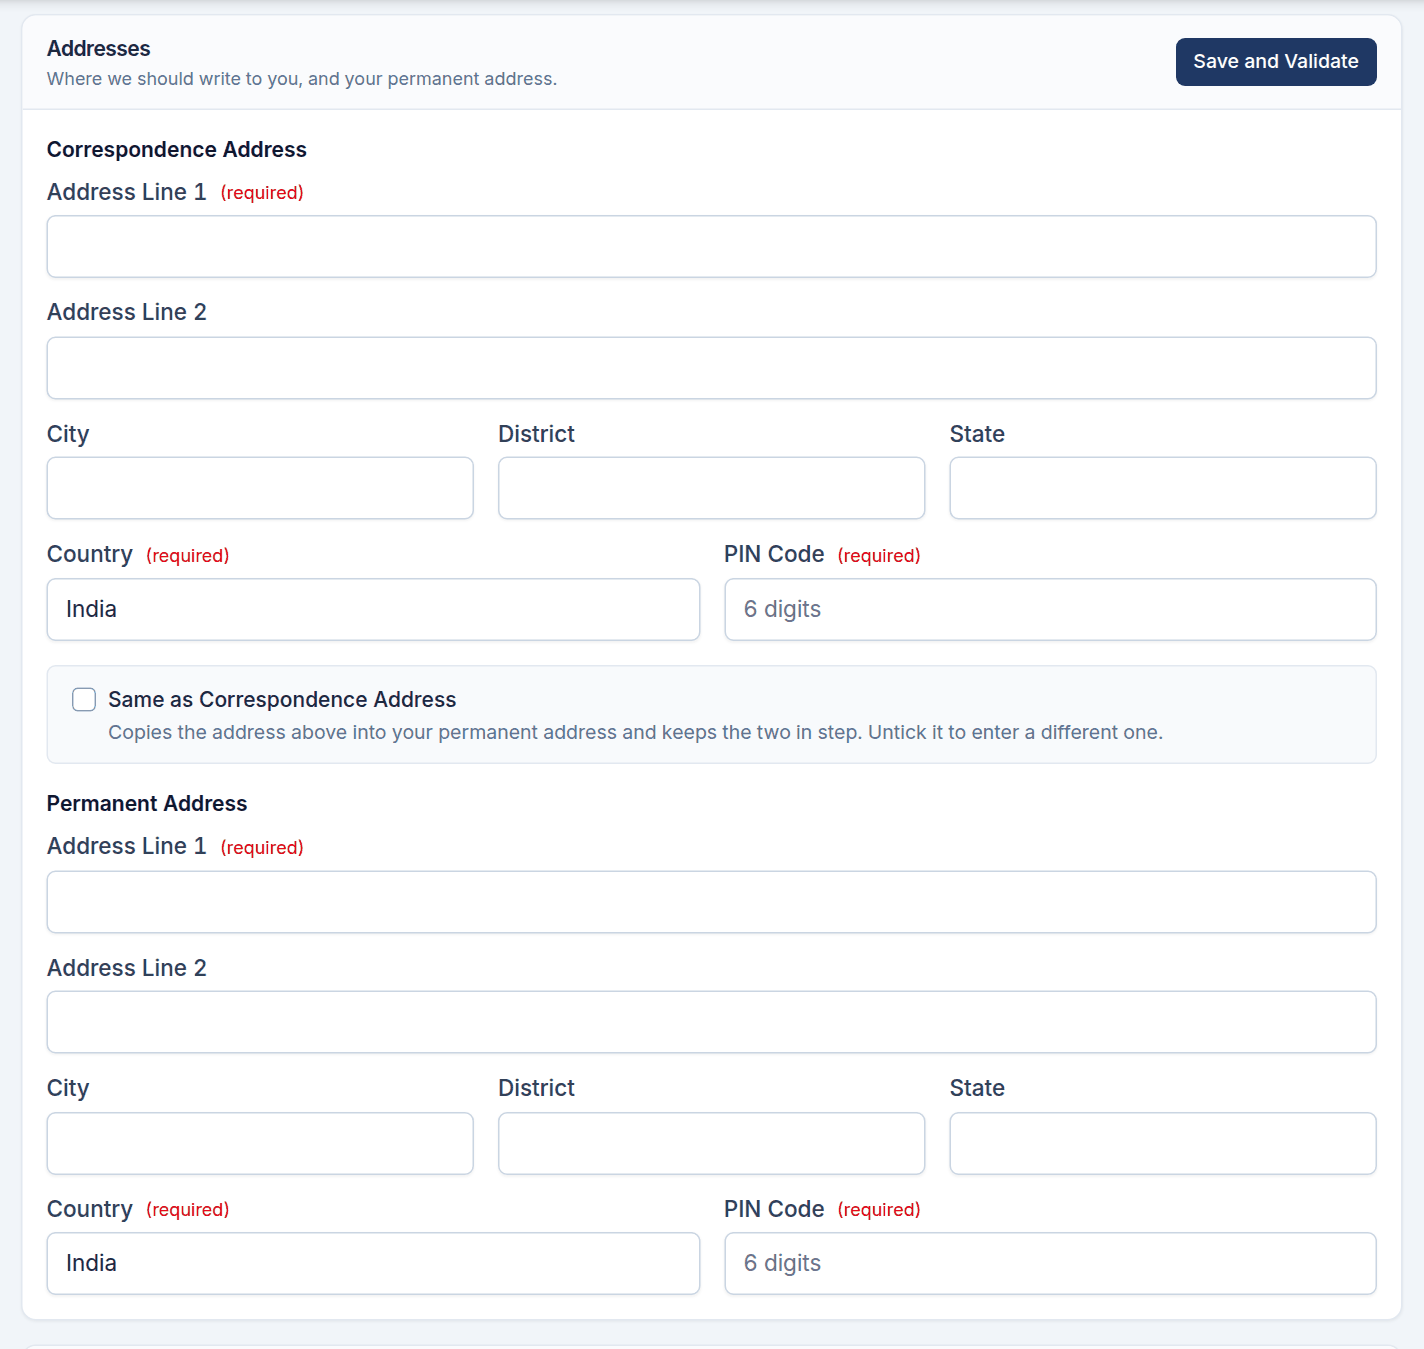
Two addresses are required: where we should write to you, and your permanent address. If they are the same, tick Same as Correspondence Address — the permanent address is filled in from the one above and kept in step with it as you edit. Untick it to enter a different one.
↑ Back to top7. Step 3 — Pay the application fee
The fee comes early, before the long part of the form.
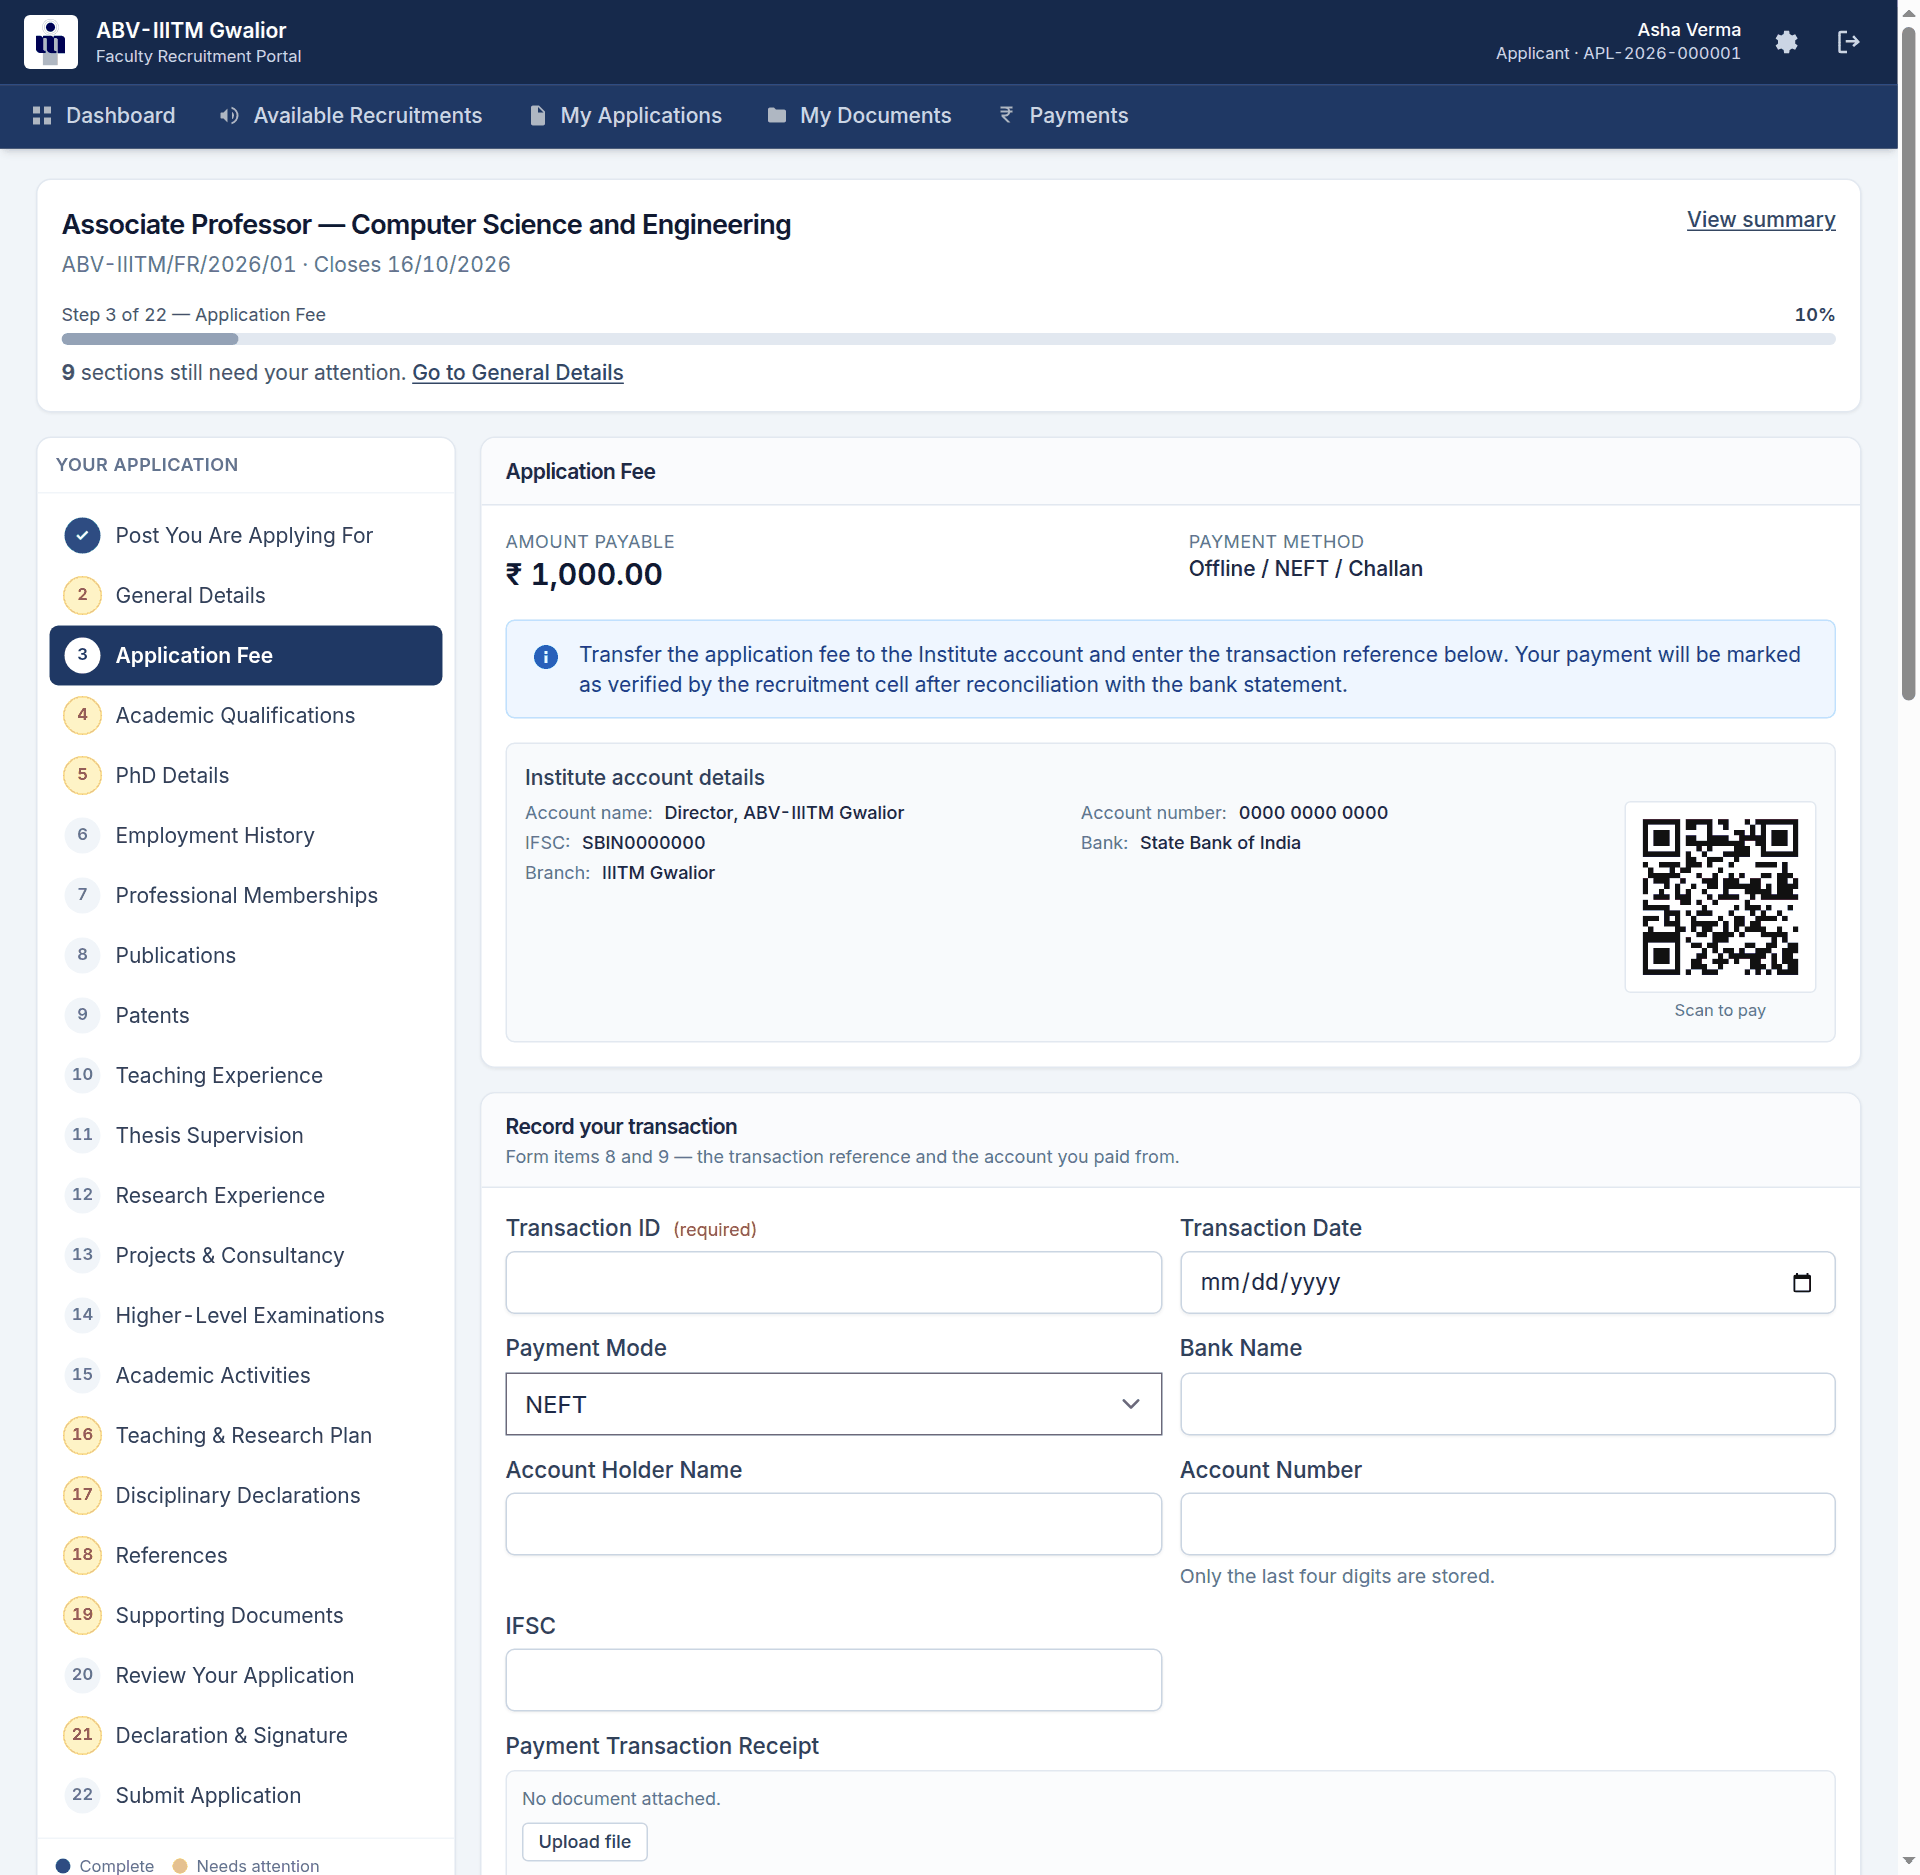
The account details and QR code above are an illustration only. Always pay using the details shown on your own fee page in the portal, which are the ones the recruitment cell maintains. Never use account details quoted in an email or a message from anyone else.
- Transfer the fee to the Institute account using NEFT, RTGS, IMPS, UPI or a demand draft — or scan the QR code on the page, if one is shown.
- Come back to this step and choose Start payment.
- Fill in the transaction details the bank gave you.
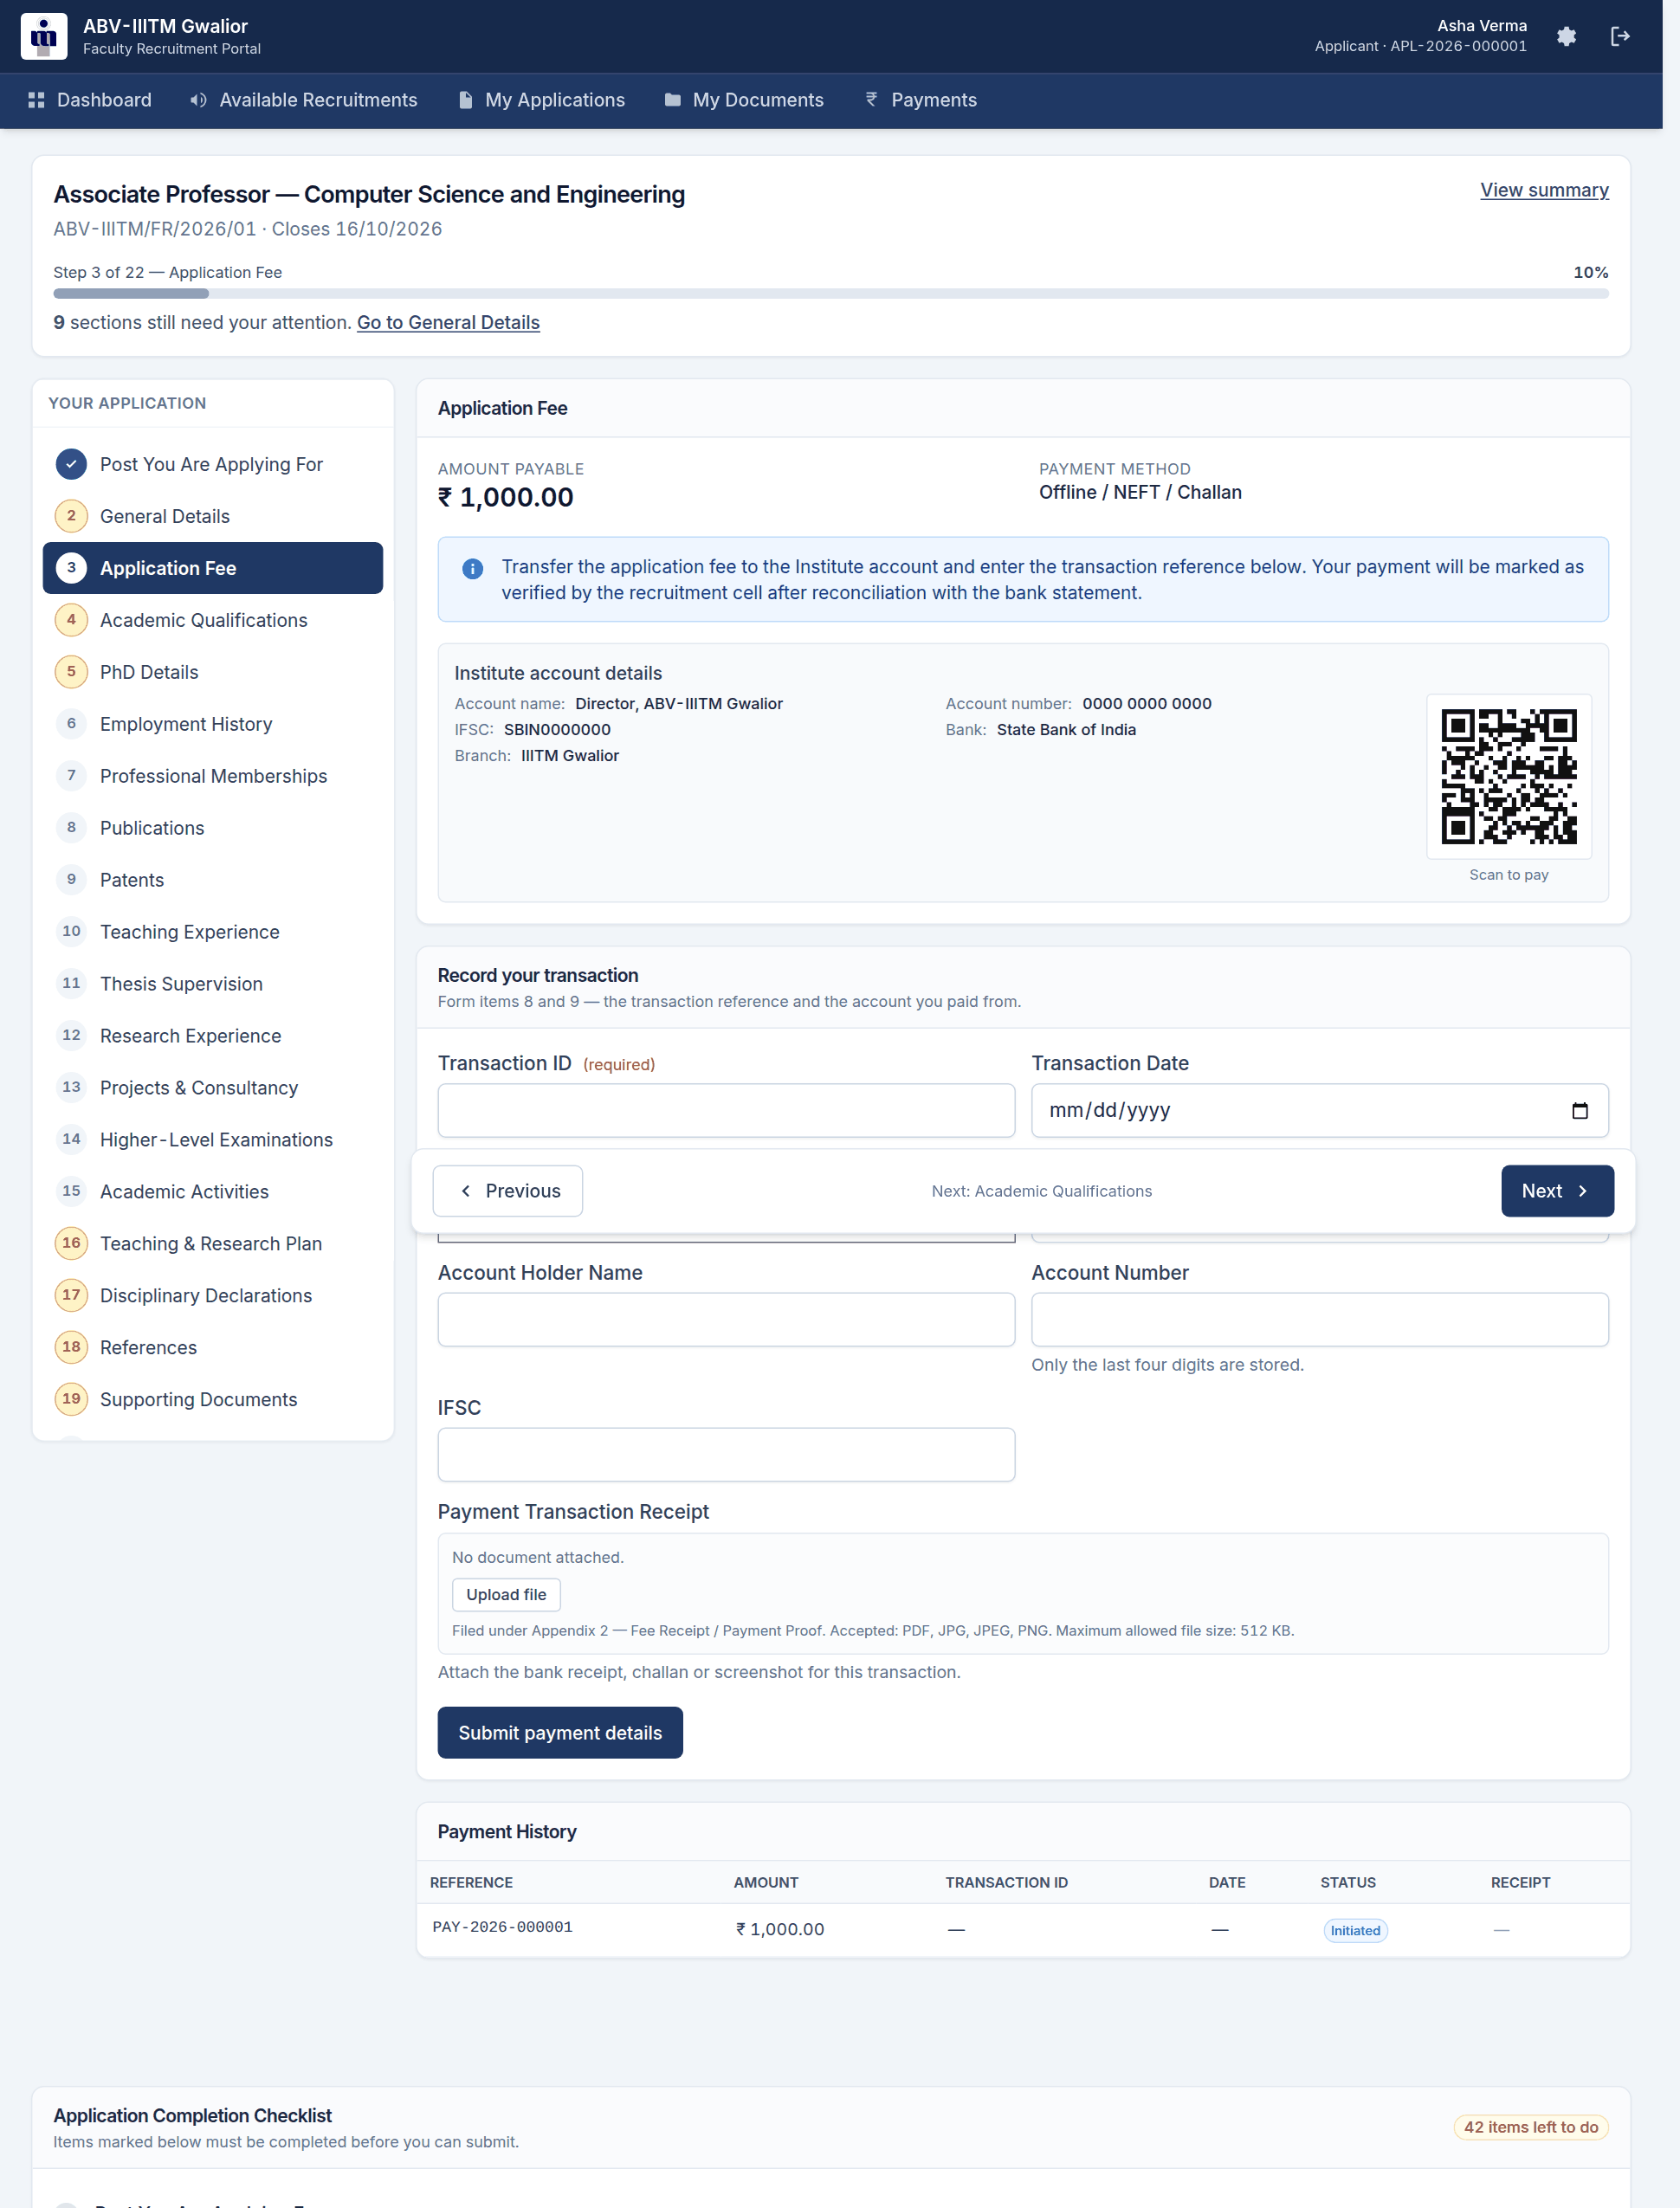
The Transaction ID is required. Please also attach your Payment Transaction Receipt — the bank receipt, challan or a screenshot of the transfer. It makes reconciliation much quicker. Only the last four digits of your account number are stored.
When you choose Submit payment details, your payment is recorded as Awaiting Verification. The recruitment cell checks it against the bank statement, usually within a few working days.
You do not have to wait for that. Once your transaction details are recorded, the fee step counts as complete and you can carry on and submit your application. The payment keeps showing Awaiting Verification until the recruitment cell reconciles it, which is their work rather than yours.
If no fee is payable for your category, this step says so and there is nothing to do.
8. Step 4 — Academic qualifications
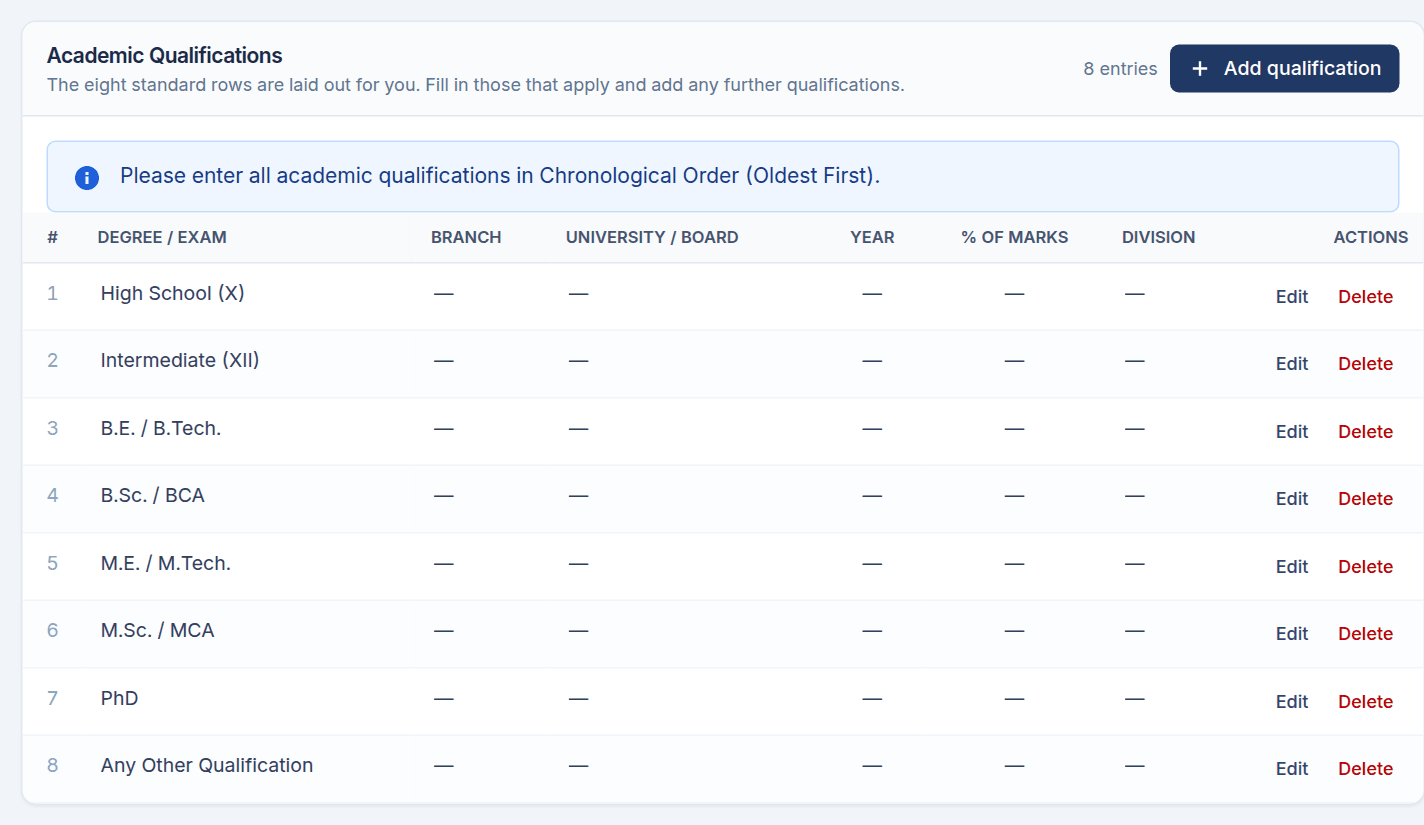
Enter your qualifications in chronological order — oldest first, starting with your school examinations and working forward to your most recent degree. At minimum, your school and graduation qualifications are required.
For each one you give the degree or examination, the branch, specialisation or subject, the university or board, the year, and your marks. Gaps in education are recorded in their own panel underneath if any apply to you.
↑ Back to top9. Step 5 — PhD details
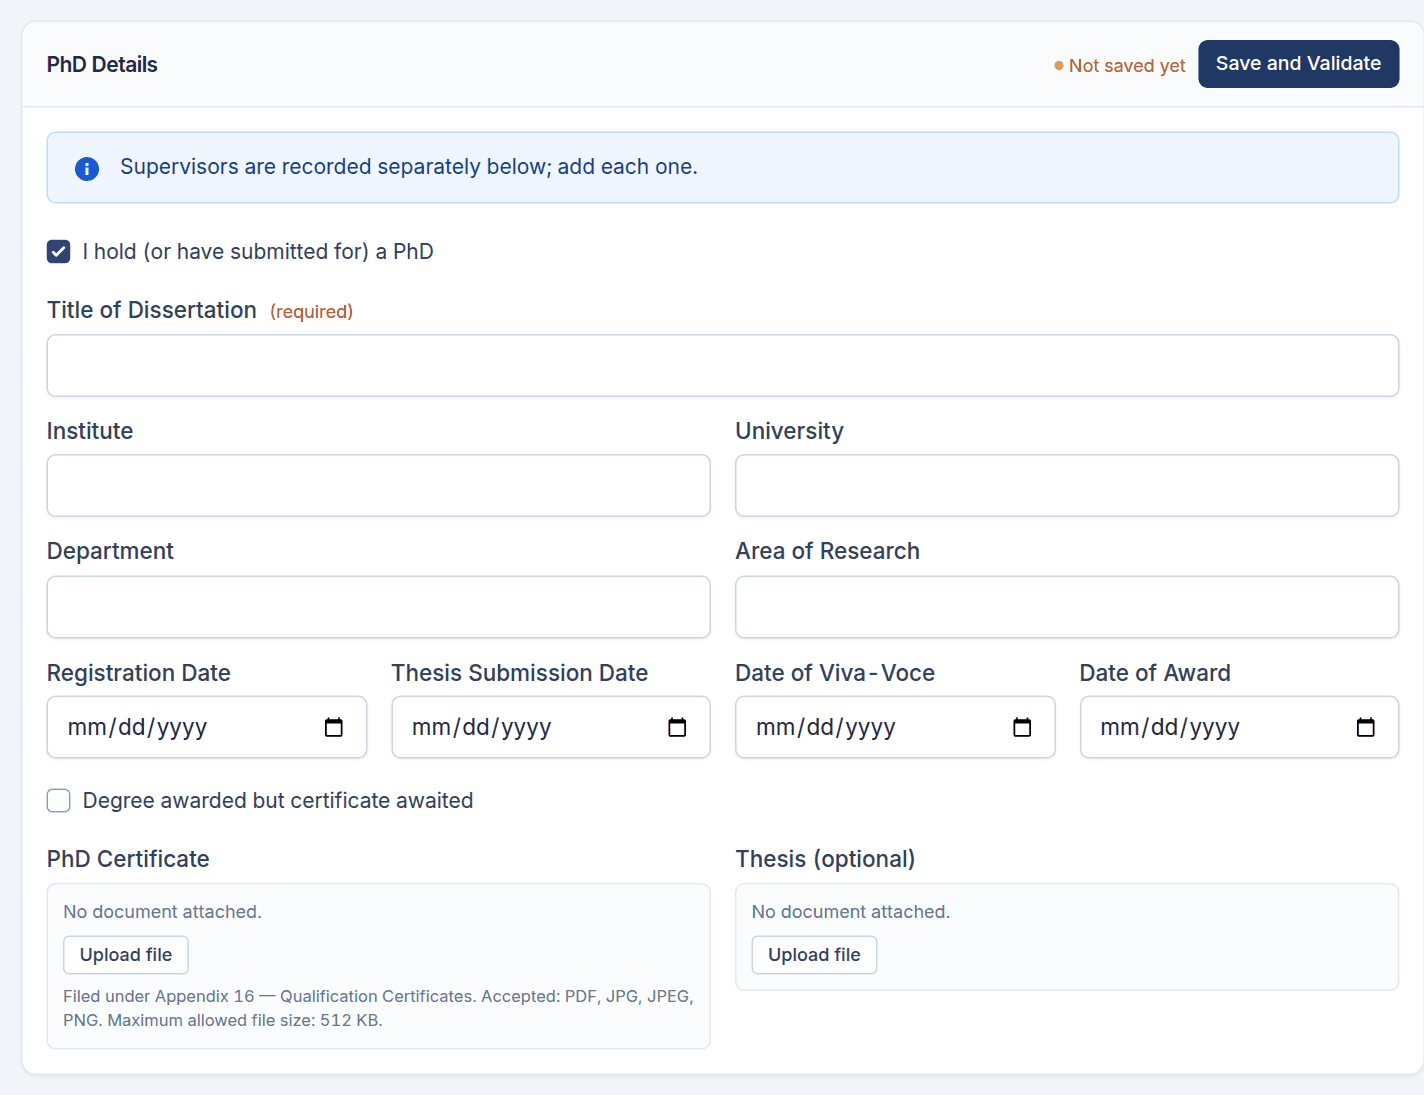
This step is required of every applicant. The box I hold (or have submitted for) a PhD is ticked and cannot be unticked, and the application cannot be submitted until this step is complete.
You must give:
- the title of your dissertation;
- the institute or university where you did it;
- at least one supervisor, added in the panel underneath;
- the date of award — unless you tick Degree awarded but certificate awaited, in which case the date is not asked for.
The registration, thesis submission, viva-voce and award dates must run in that order. If one of them is earlier than the one before it, the form says so.
↑ Back to top10. Step 6 — Employment history
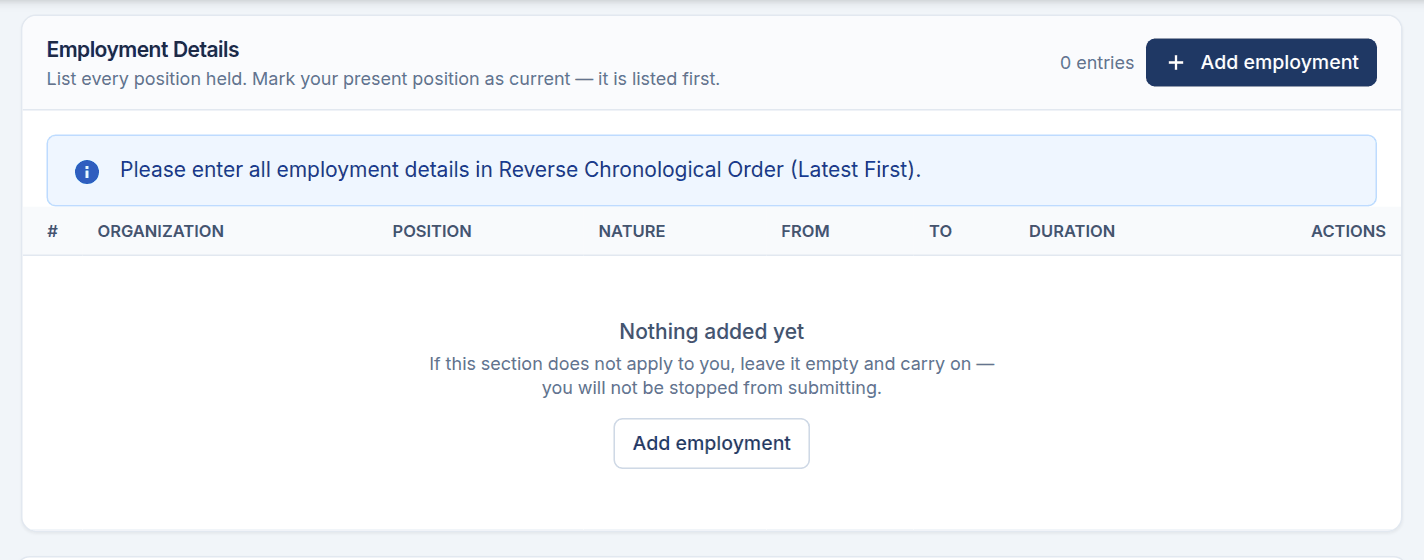
Enter your employment in reverse chronological order — latest first. Leave the end date empty for your current post and tick that it is current.
The portal works out the duration of each post for you, and totals your experience after the PhD was awarded separately, since that is what the eligibility conditions are written in terms of. You do not enter either figure yourself.
↑ Back to top11. Steps 7 to 18 — The rest of your record
These steps cover your professional memberships, publications, patents, teaching experience, thesis supervision, research experience, projects and consultancy, higher-level examinations, academic activities, your teaching and research plan, the disciplinary declarations, and your referees.
Most of them are lists you add entries to. They start empty:
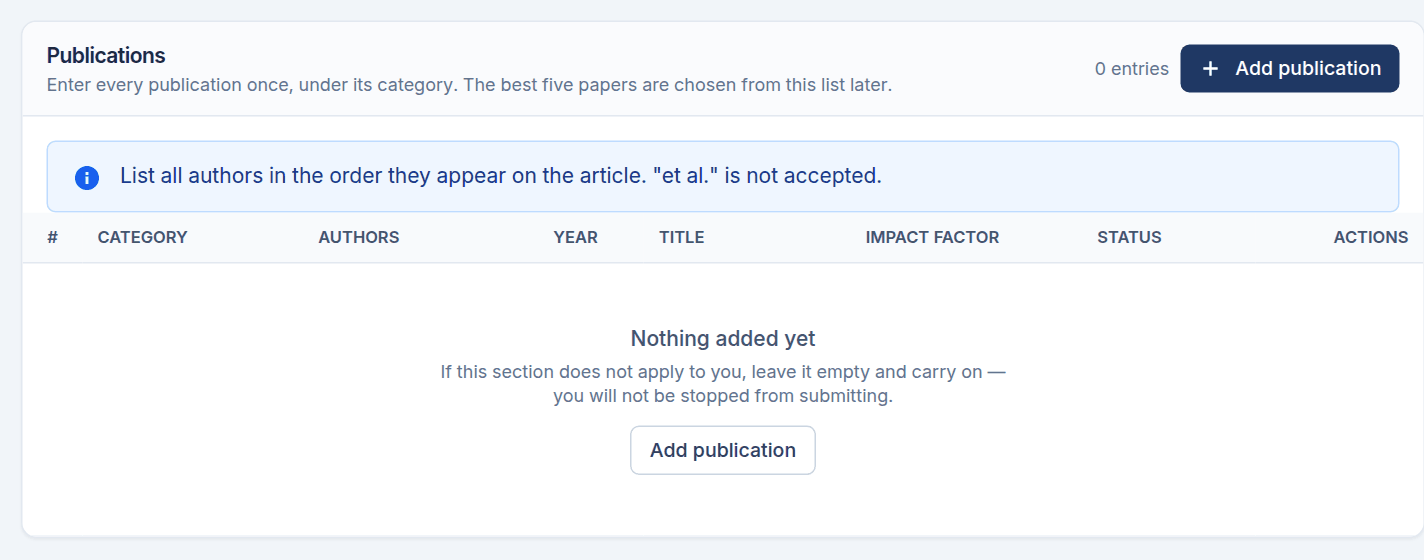
Choose Add to open a form for one entry.
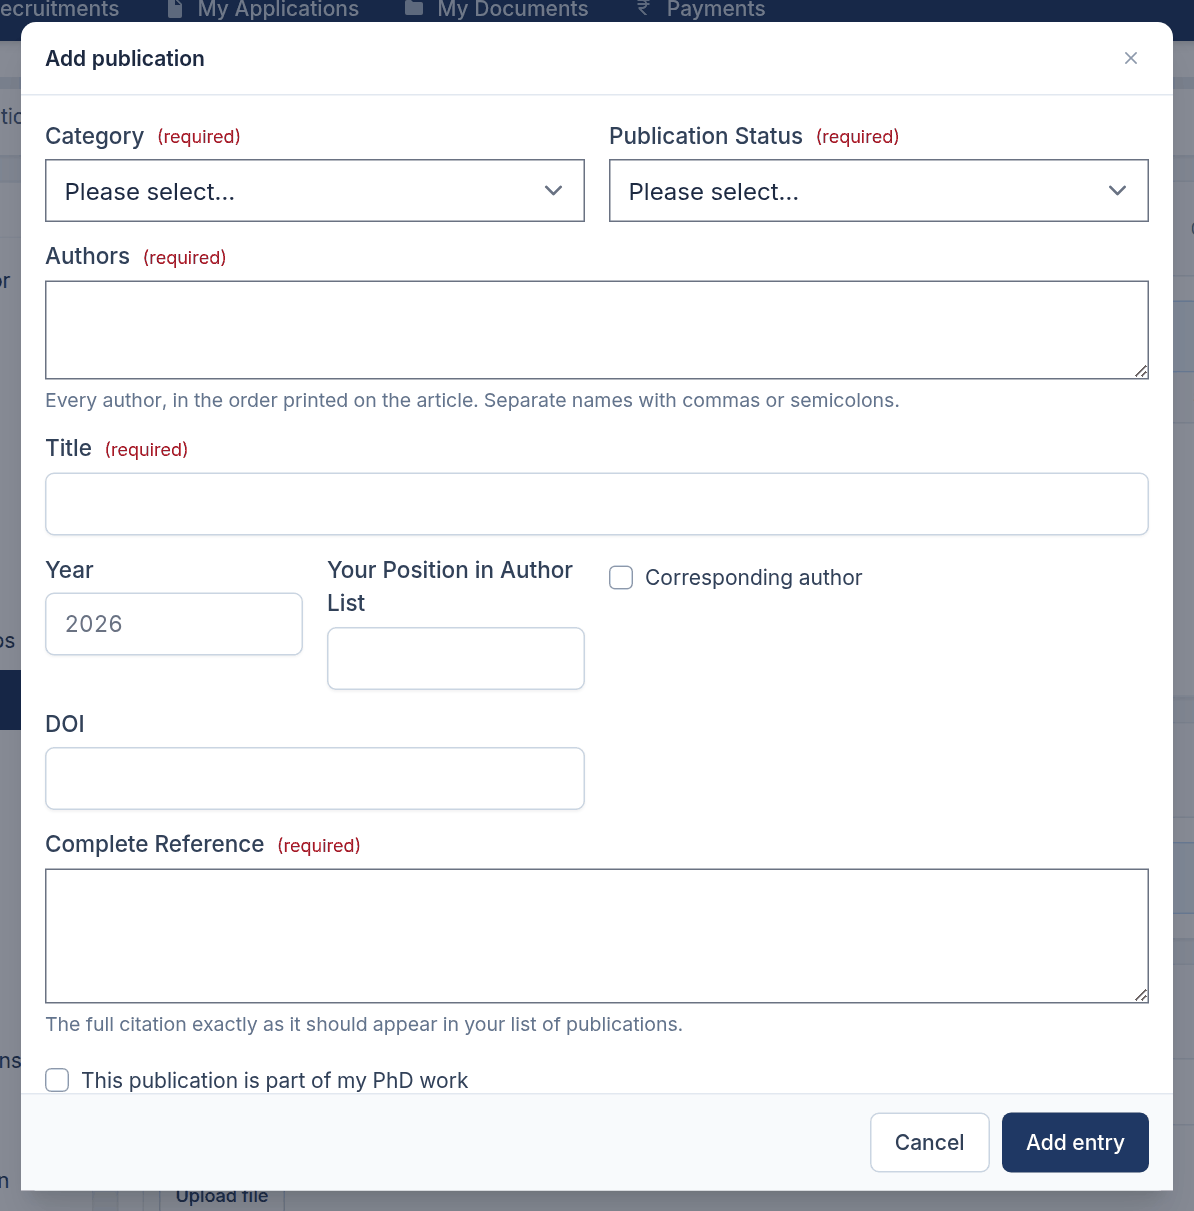
The entry appears in the table, where you can Edit or Delete it later.
When something is missing
If anything required is missing, the portal lists every problem at the top of the form and marks each field underneath.
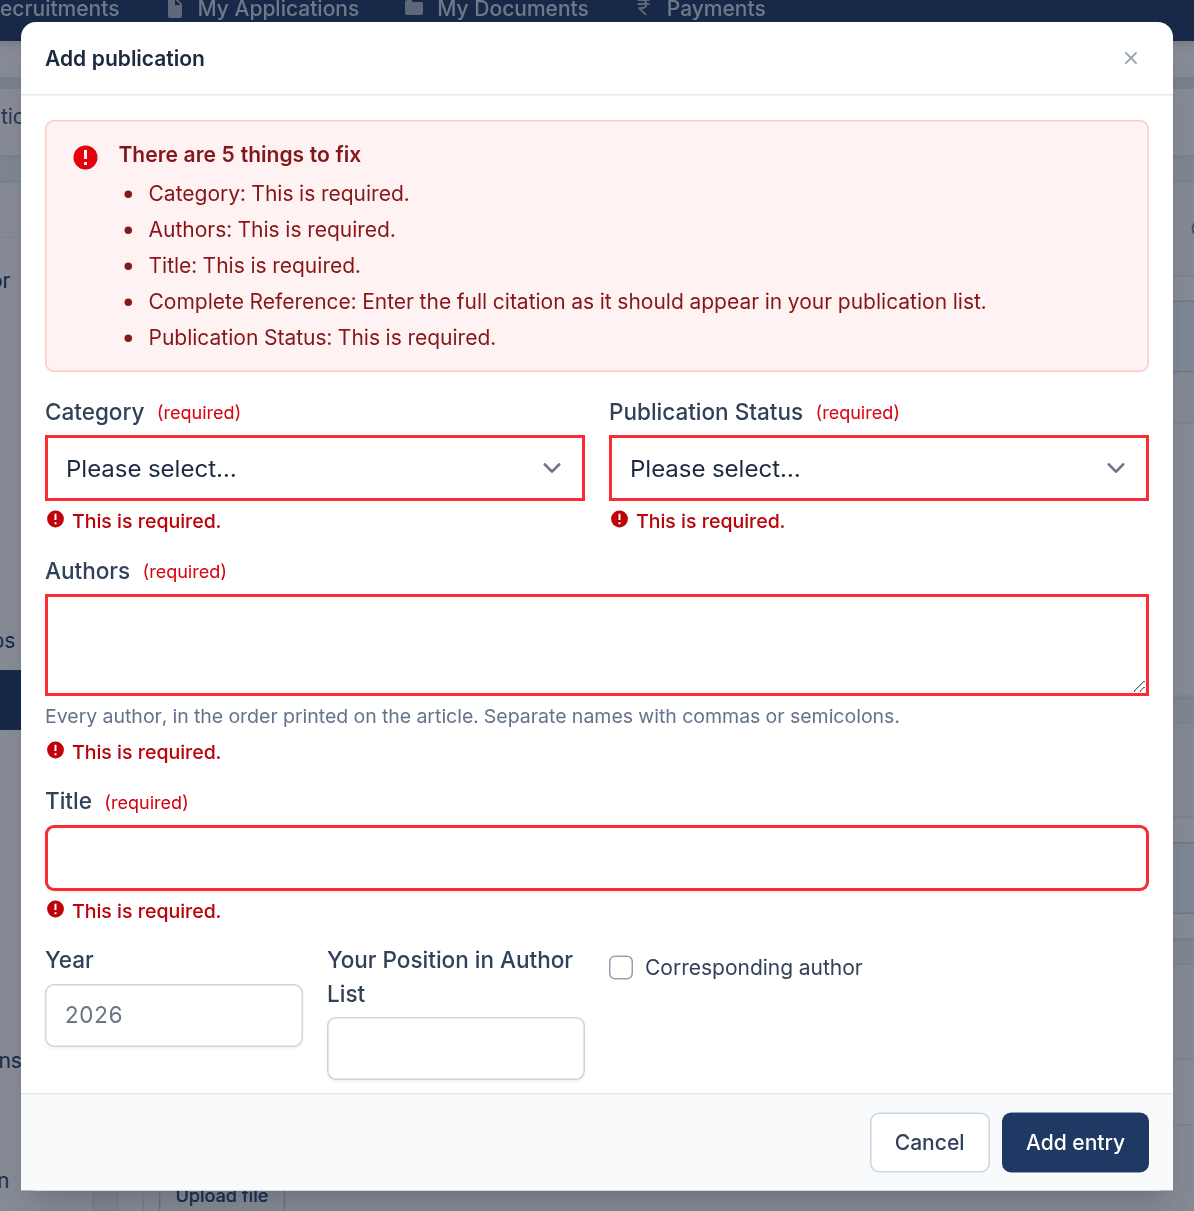
Points worth knowing
- Professional memberships (IEEE, ACM etc.). One entry per body, with your membership grade and number.
- Research experience is for work excluding the research you did for your Master's or PhD degrees.
- Teaching and research plan. Up to 500 words. The word count is shown as you type.
- Referees. Three are required, with a working email and mobile number for each, and at least one should be familiar with your recent work.
12. Step 8 — Publications
Enter every author in the order printed on the article. The form does not accept “et al.” Enter each publication once, under its category.
Three panels follow the list of publications.
Five best papers
Choose your five strongest papers from the list you entered. Reprints of those five are uploaded under Appendix 12 in the supporting documents step.
Other publications
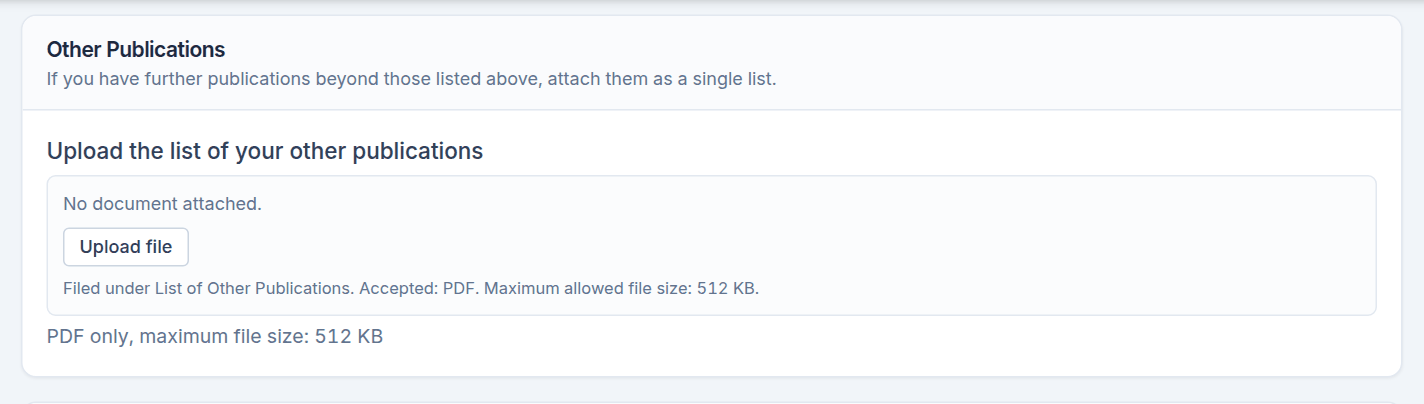
If you have further publications beyond those you have listed, attach them as a single list: one PDF file, within the size limit stated on the control. No other format is accepted.
Summary of total number of publications
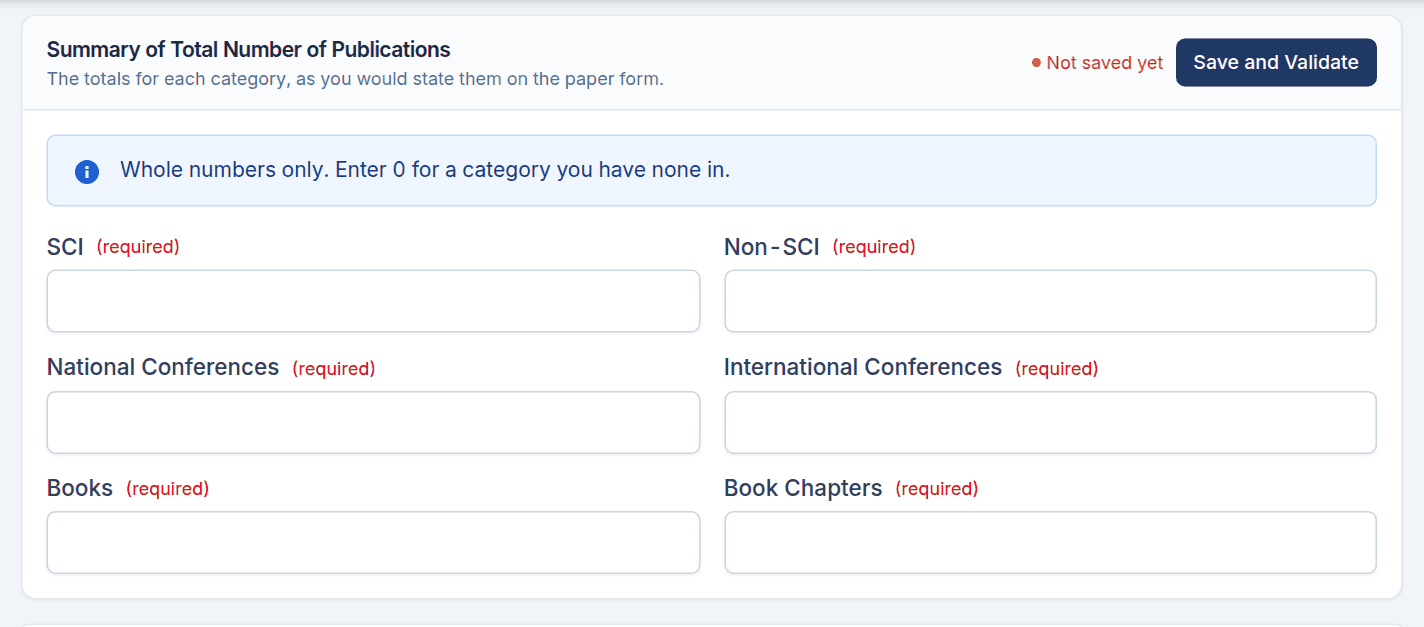
Give your totals for each category: SCI, Non-SCI, national conferences, international conferences, books and book chapters. Whole numbers only — enter 0 for a category you have none in rather than leaving it blank.
↑ Back to top13. Step 17 — Disciplinary declarations
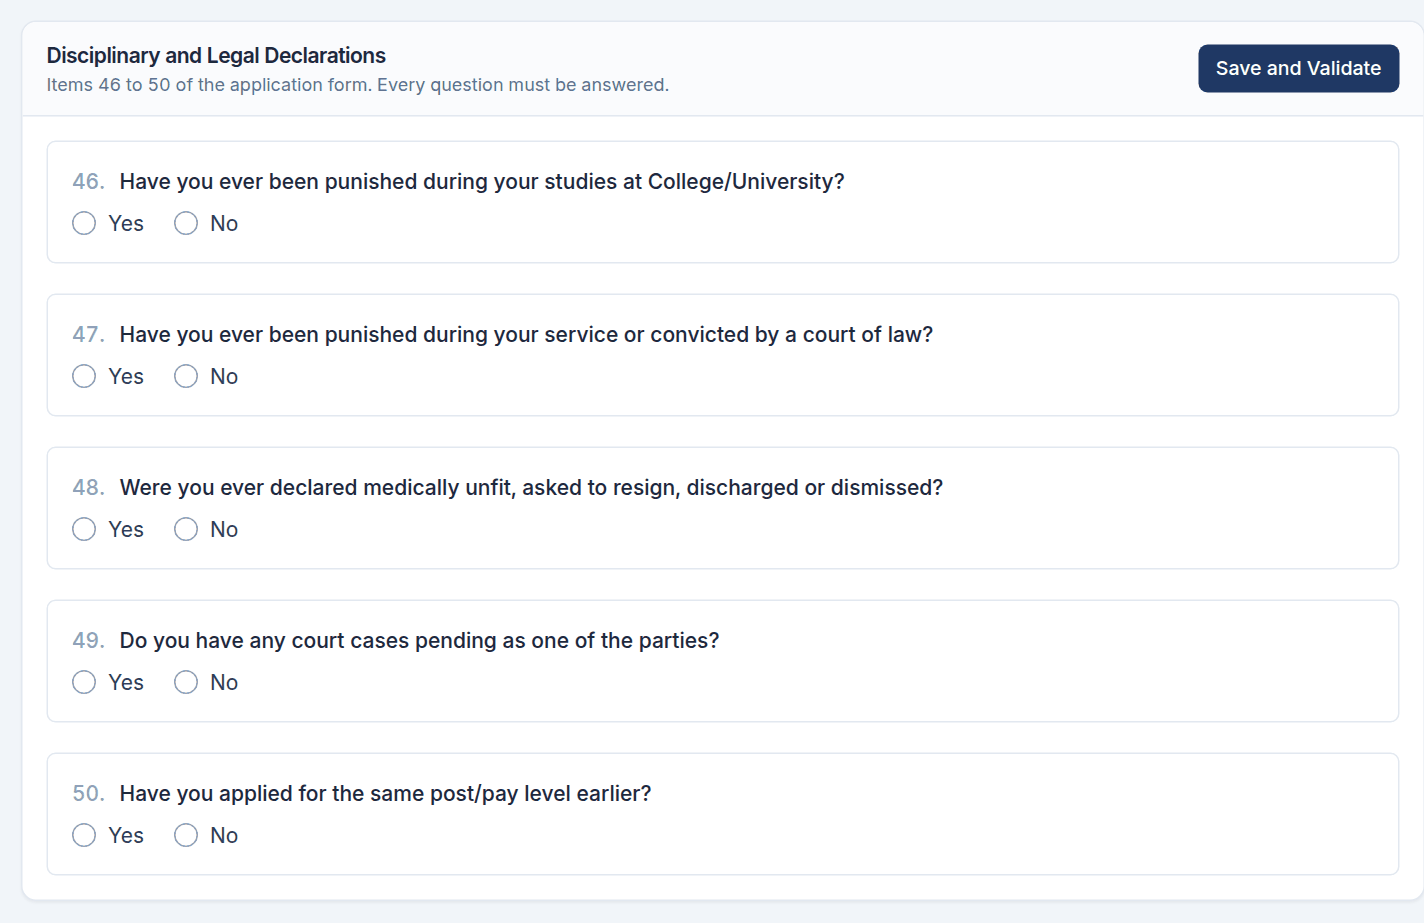
These are items 46 to 50 of the application form. Every question must be answered Yes or No — leaving one blank is not the same as answering “No”, and the application cannot be submitted until all five are answered. Where you answer Yes, a box appears for the details.
↑ Back to top14. Step 19 — Supporting documents
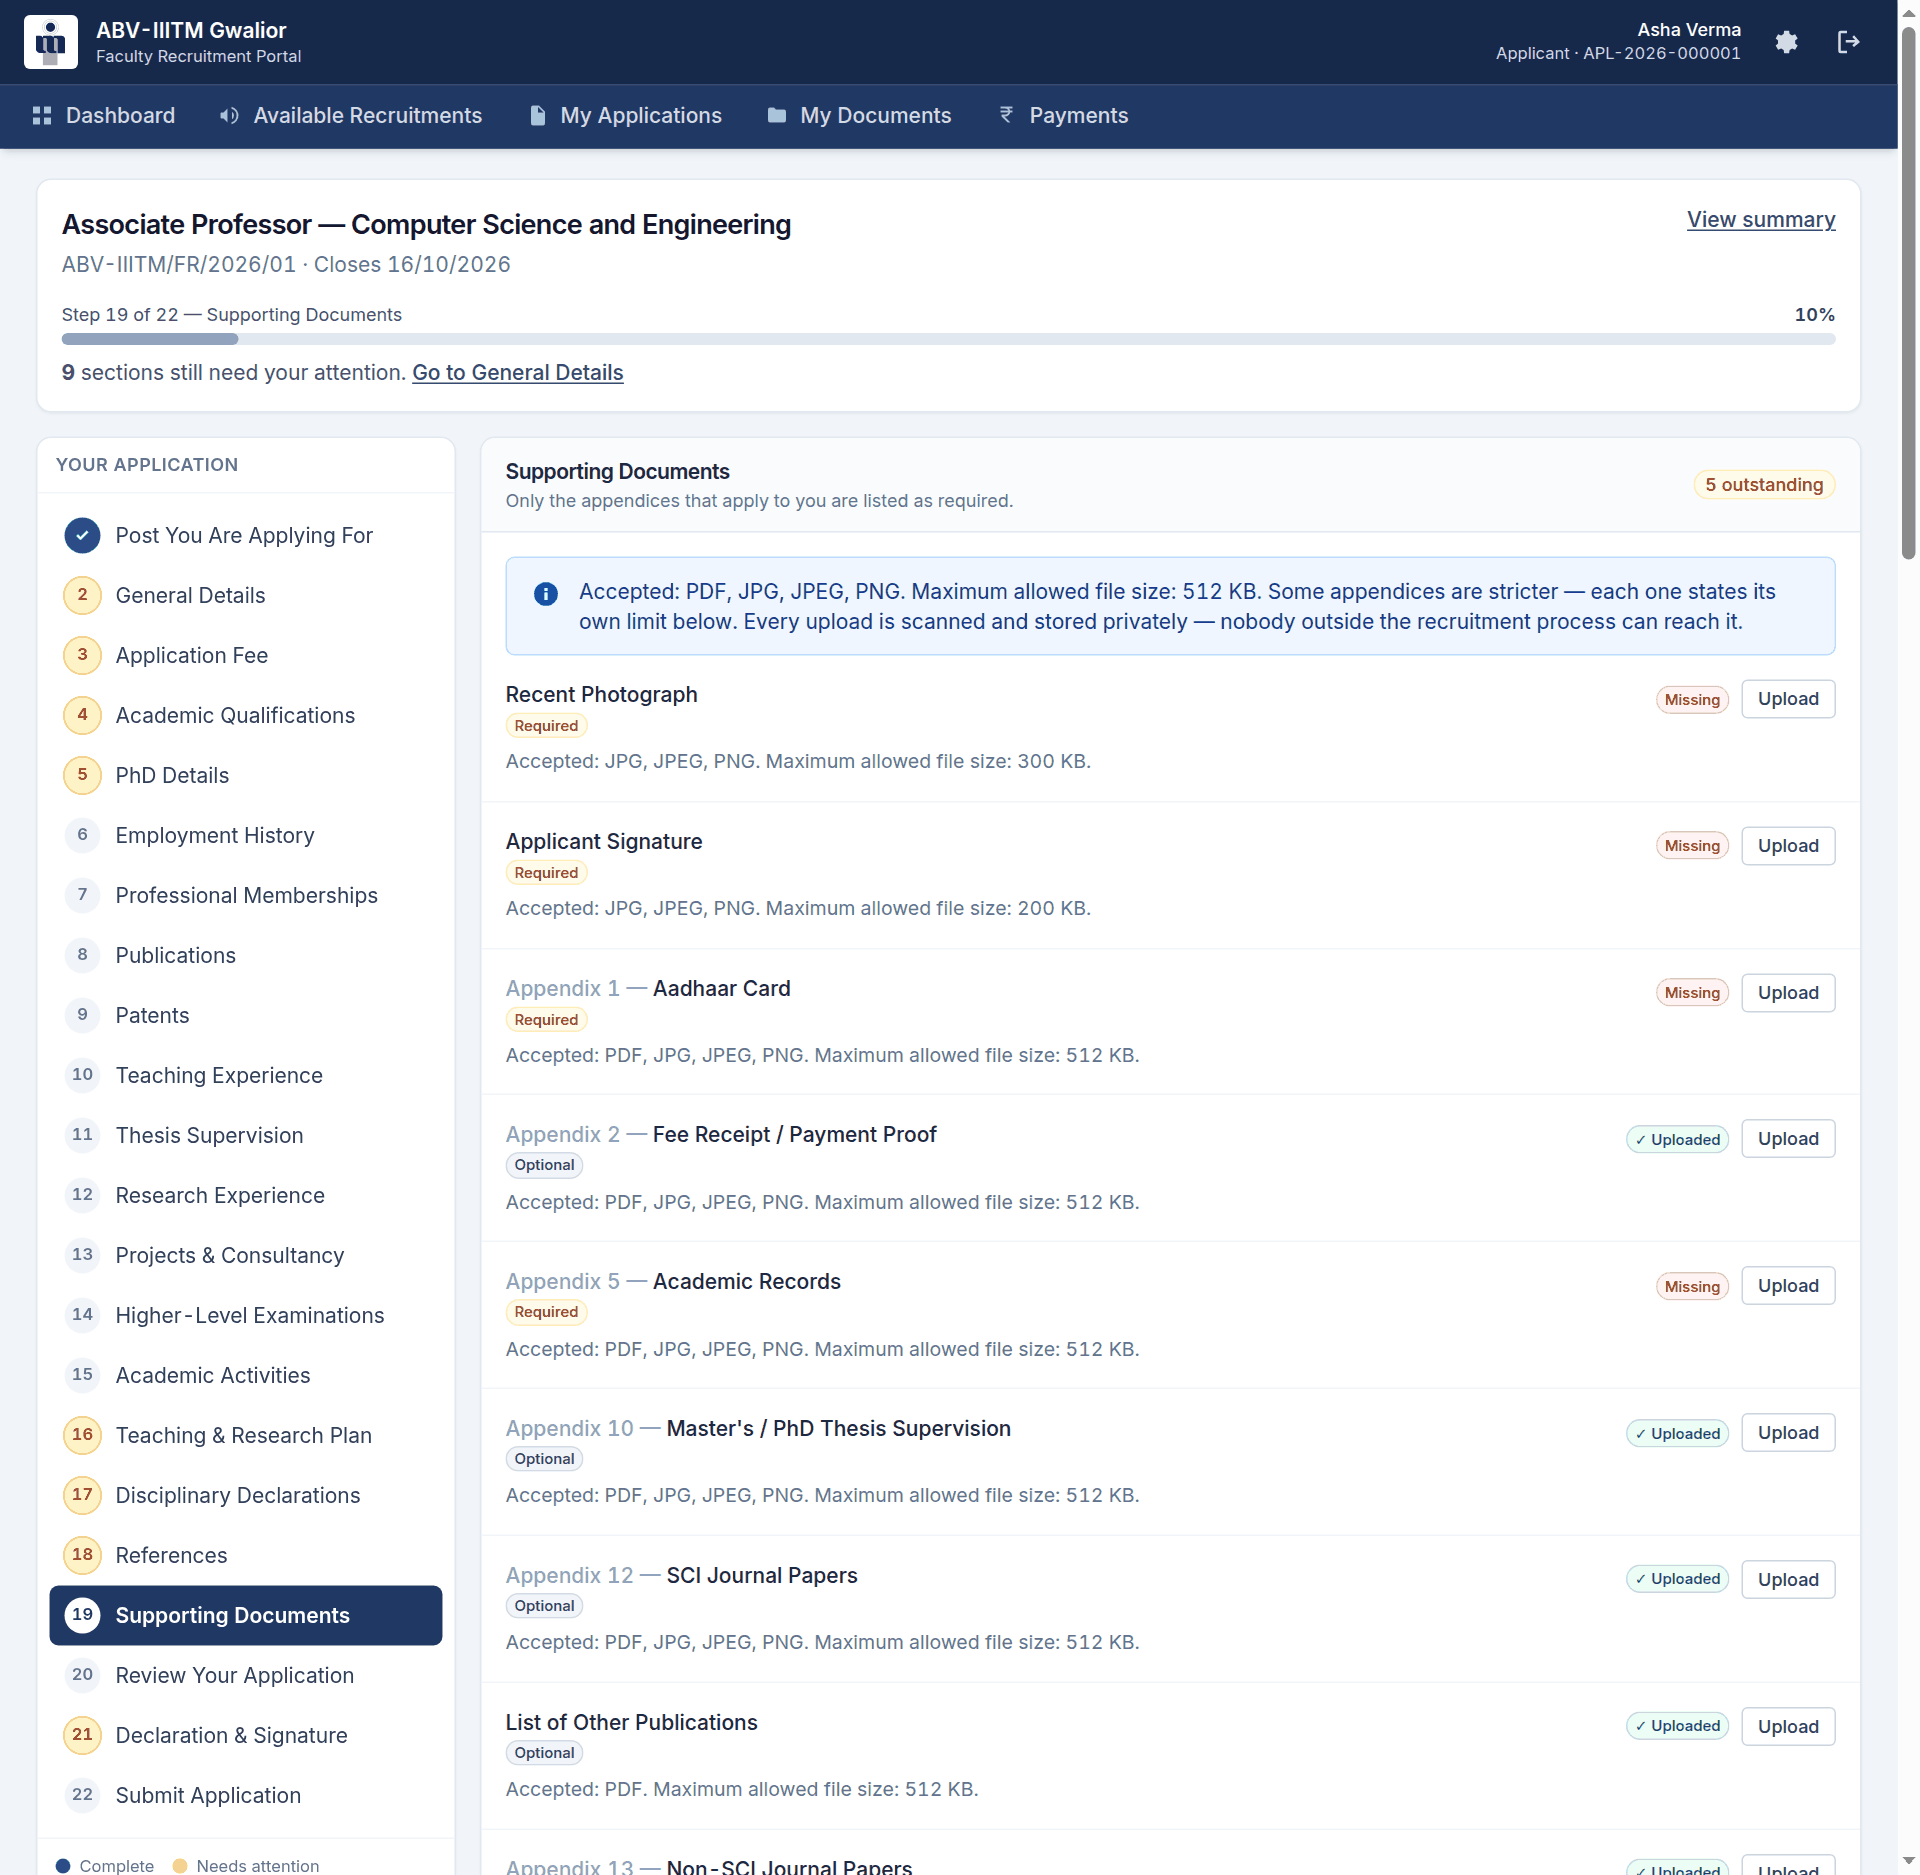
Only the appendices relevant to your circumstances are listed as required — if you are not claiming a category concession, you are not asked for a category certificate.
Accepted formats are PDF, JPG, JPEG and PNG, and the maximum size is 512 KB. Some appendices are stricter and say so: the photograph is 300 KB and the signature 200 KB. The limit is enforced when the file is stored, so a file over it is refused however it is sent. Every upload is stored privately; nobody outside the recruitment process can reach it, and every time one is opened it is recorded.
Some documents can also be uploaded from the section they belong to — a degree certificate from the qualifications step, the PhD certificate from the PhD step. Either way works, and they appear in both places.
15. Step 20 — Review your application
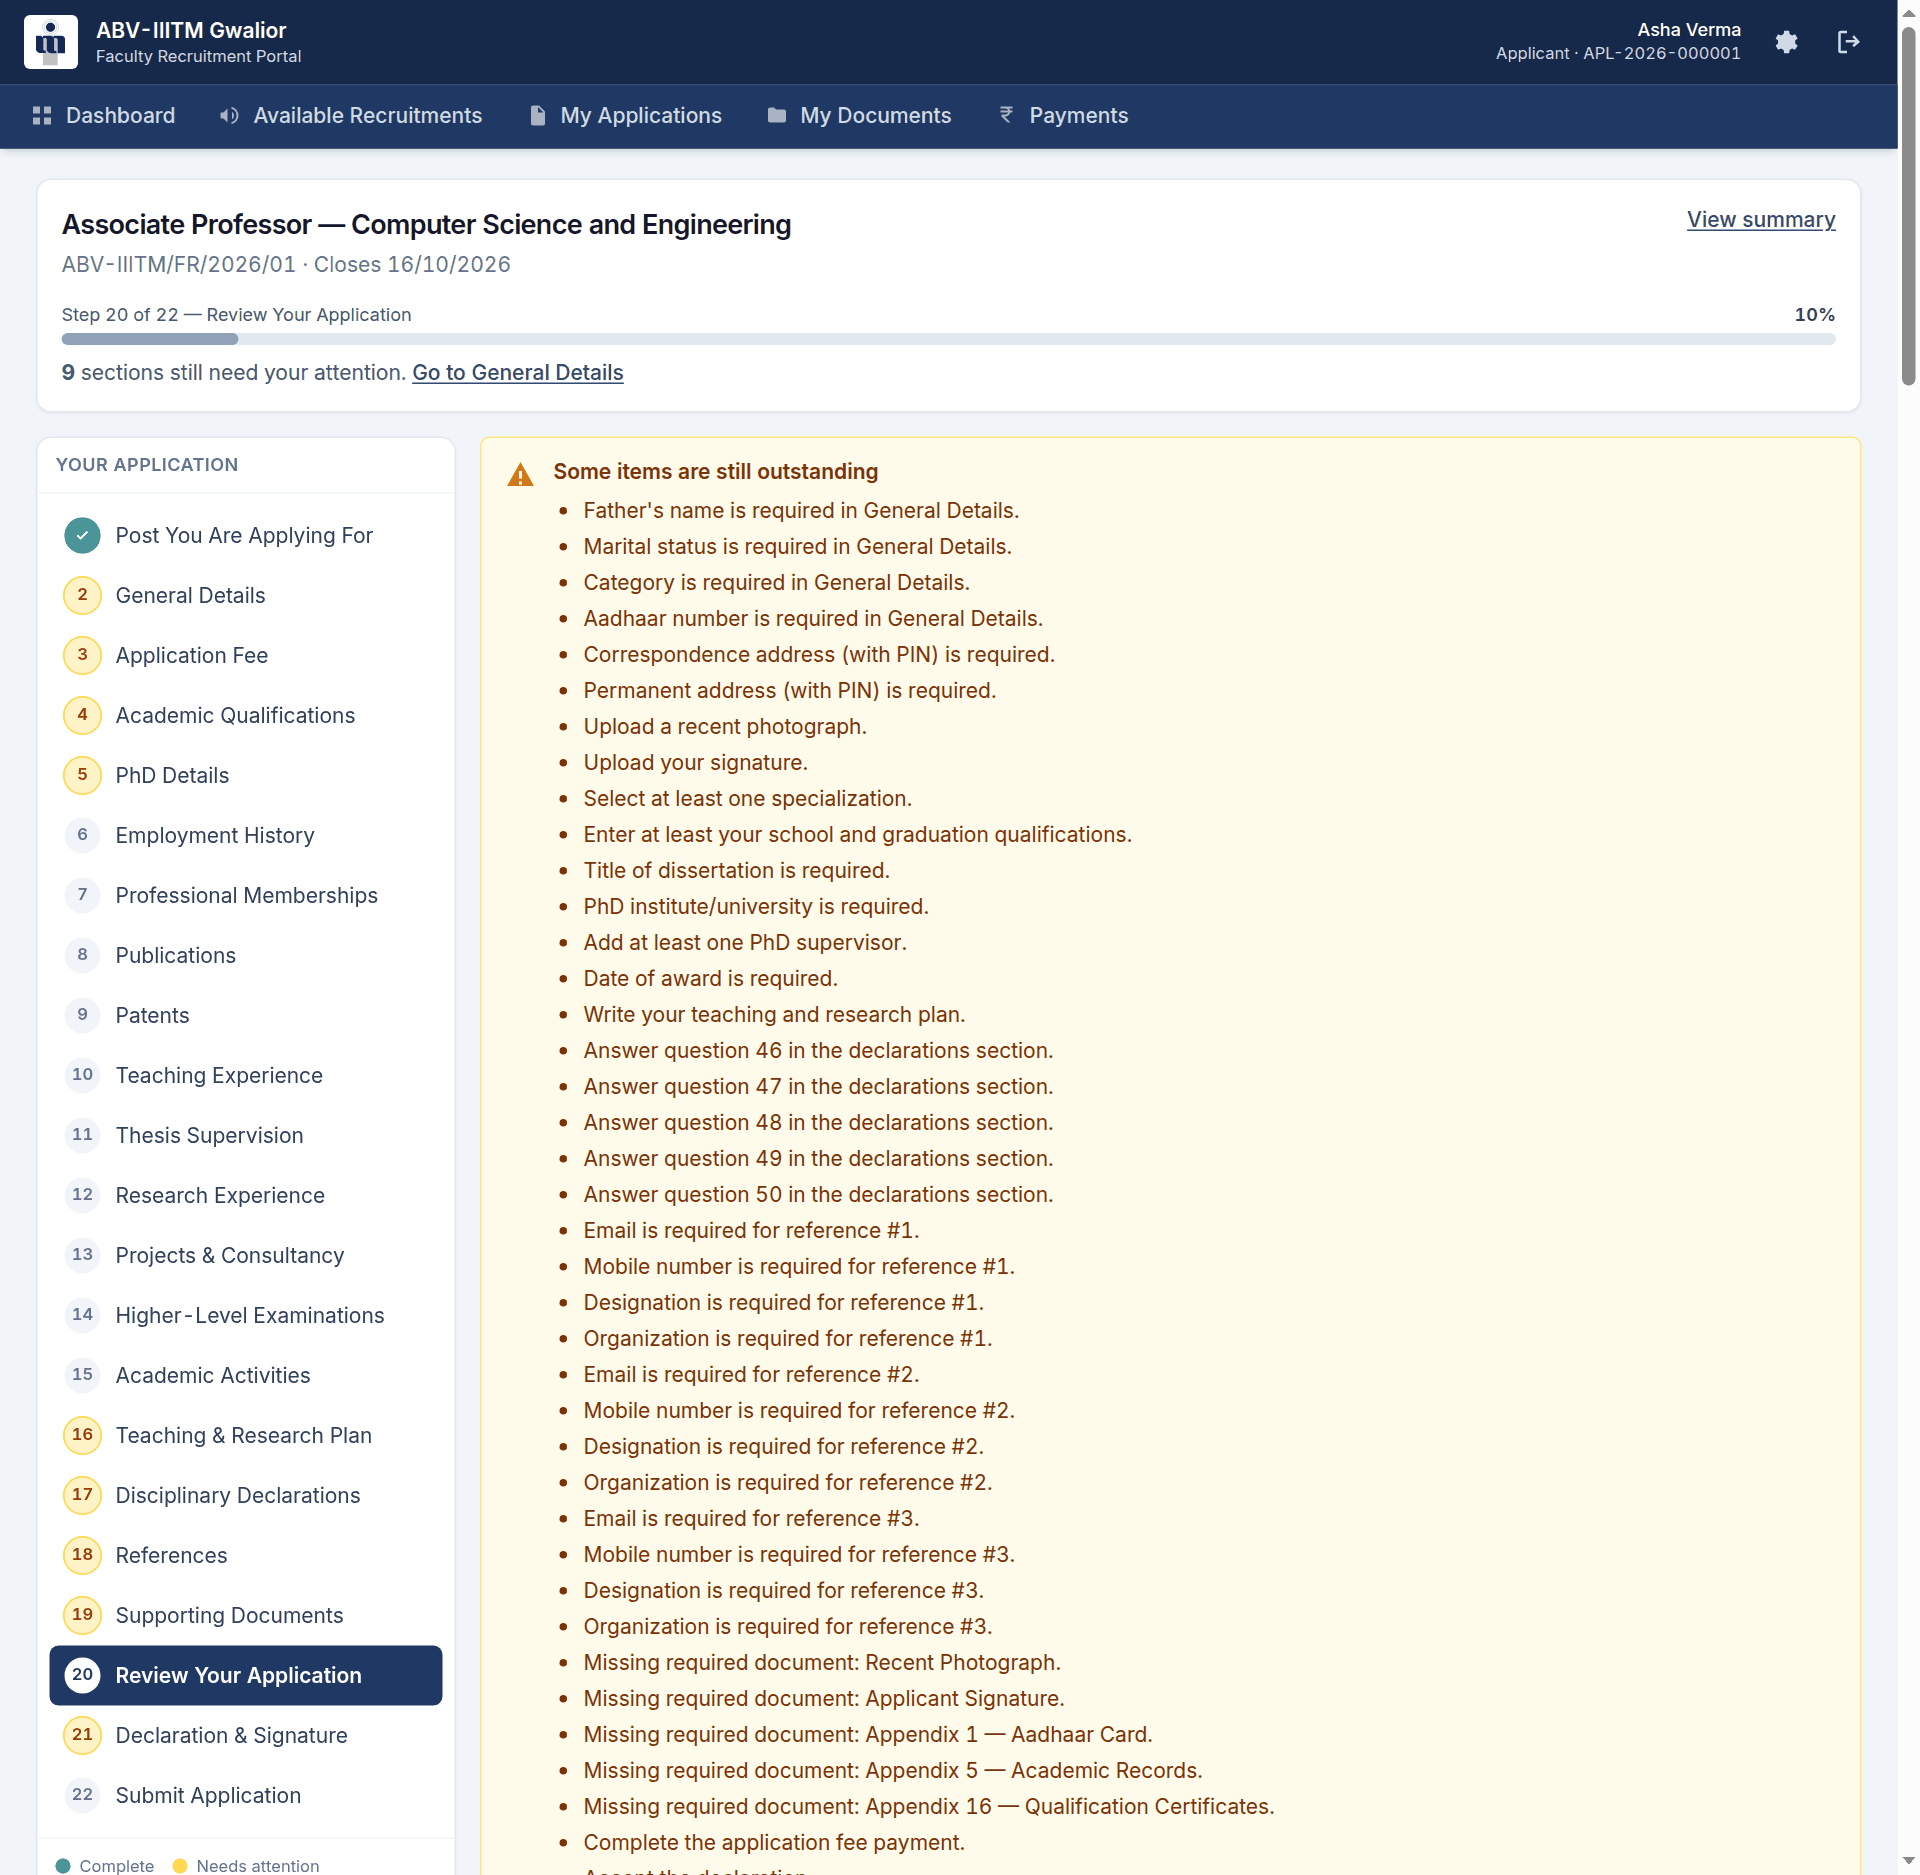
Scroll past the outstanding list to read your application through. If you find a mistake, use the step list to go back, correct it, and return here.
The Index of Appendices
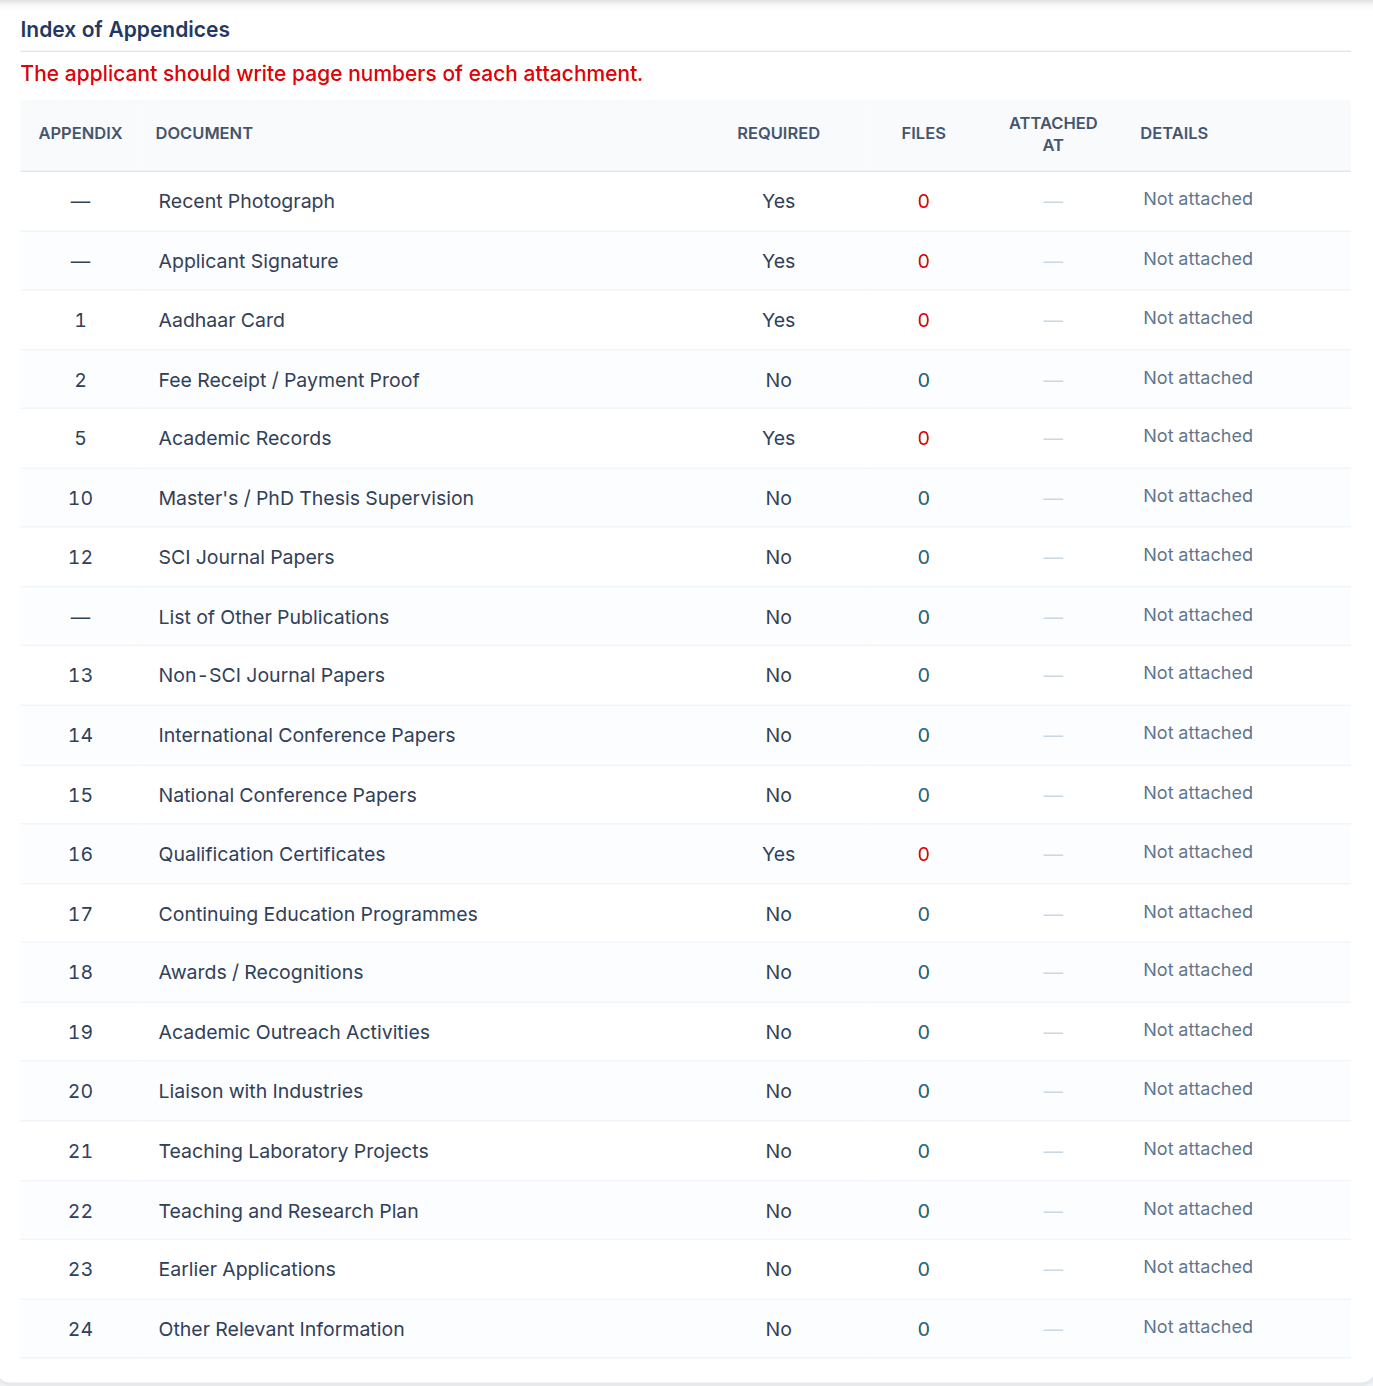
At the end of the review is the Index of Appendices, which is printed with your application. It carries an Attached at column, which the portal leaves blank on purpose.
The applicant should write page numbers of each attachment. Write the page number where each appendix appears in the set of documents you assemble. The portal does not fill this in for you.
This is your last comfortable opportunity to make changes. After submission you cannot edit anything unless the recruitment cell reopens your application for you.
16. Step 21 — Declaration and signature
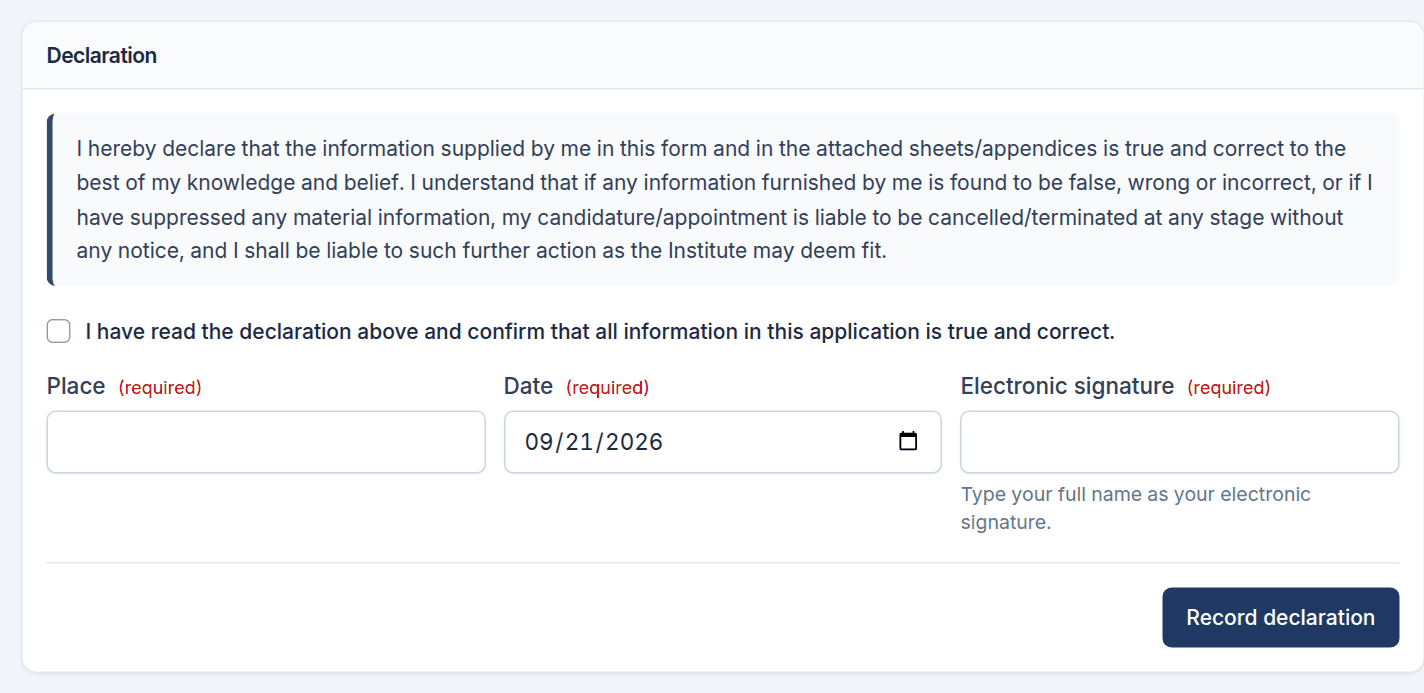
Read the declaration, tick to accept it, and enter the place and date. Upload your signature if you have not already done so, then choose Record declaration.
The declaration is the formal statement that everything you have entered is true. Please read it rather than skipping past it.
↑ Back to top17. Step 22 — Submit
The last step checks your whole application. If anything is still outstanding, it says exactly what:
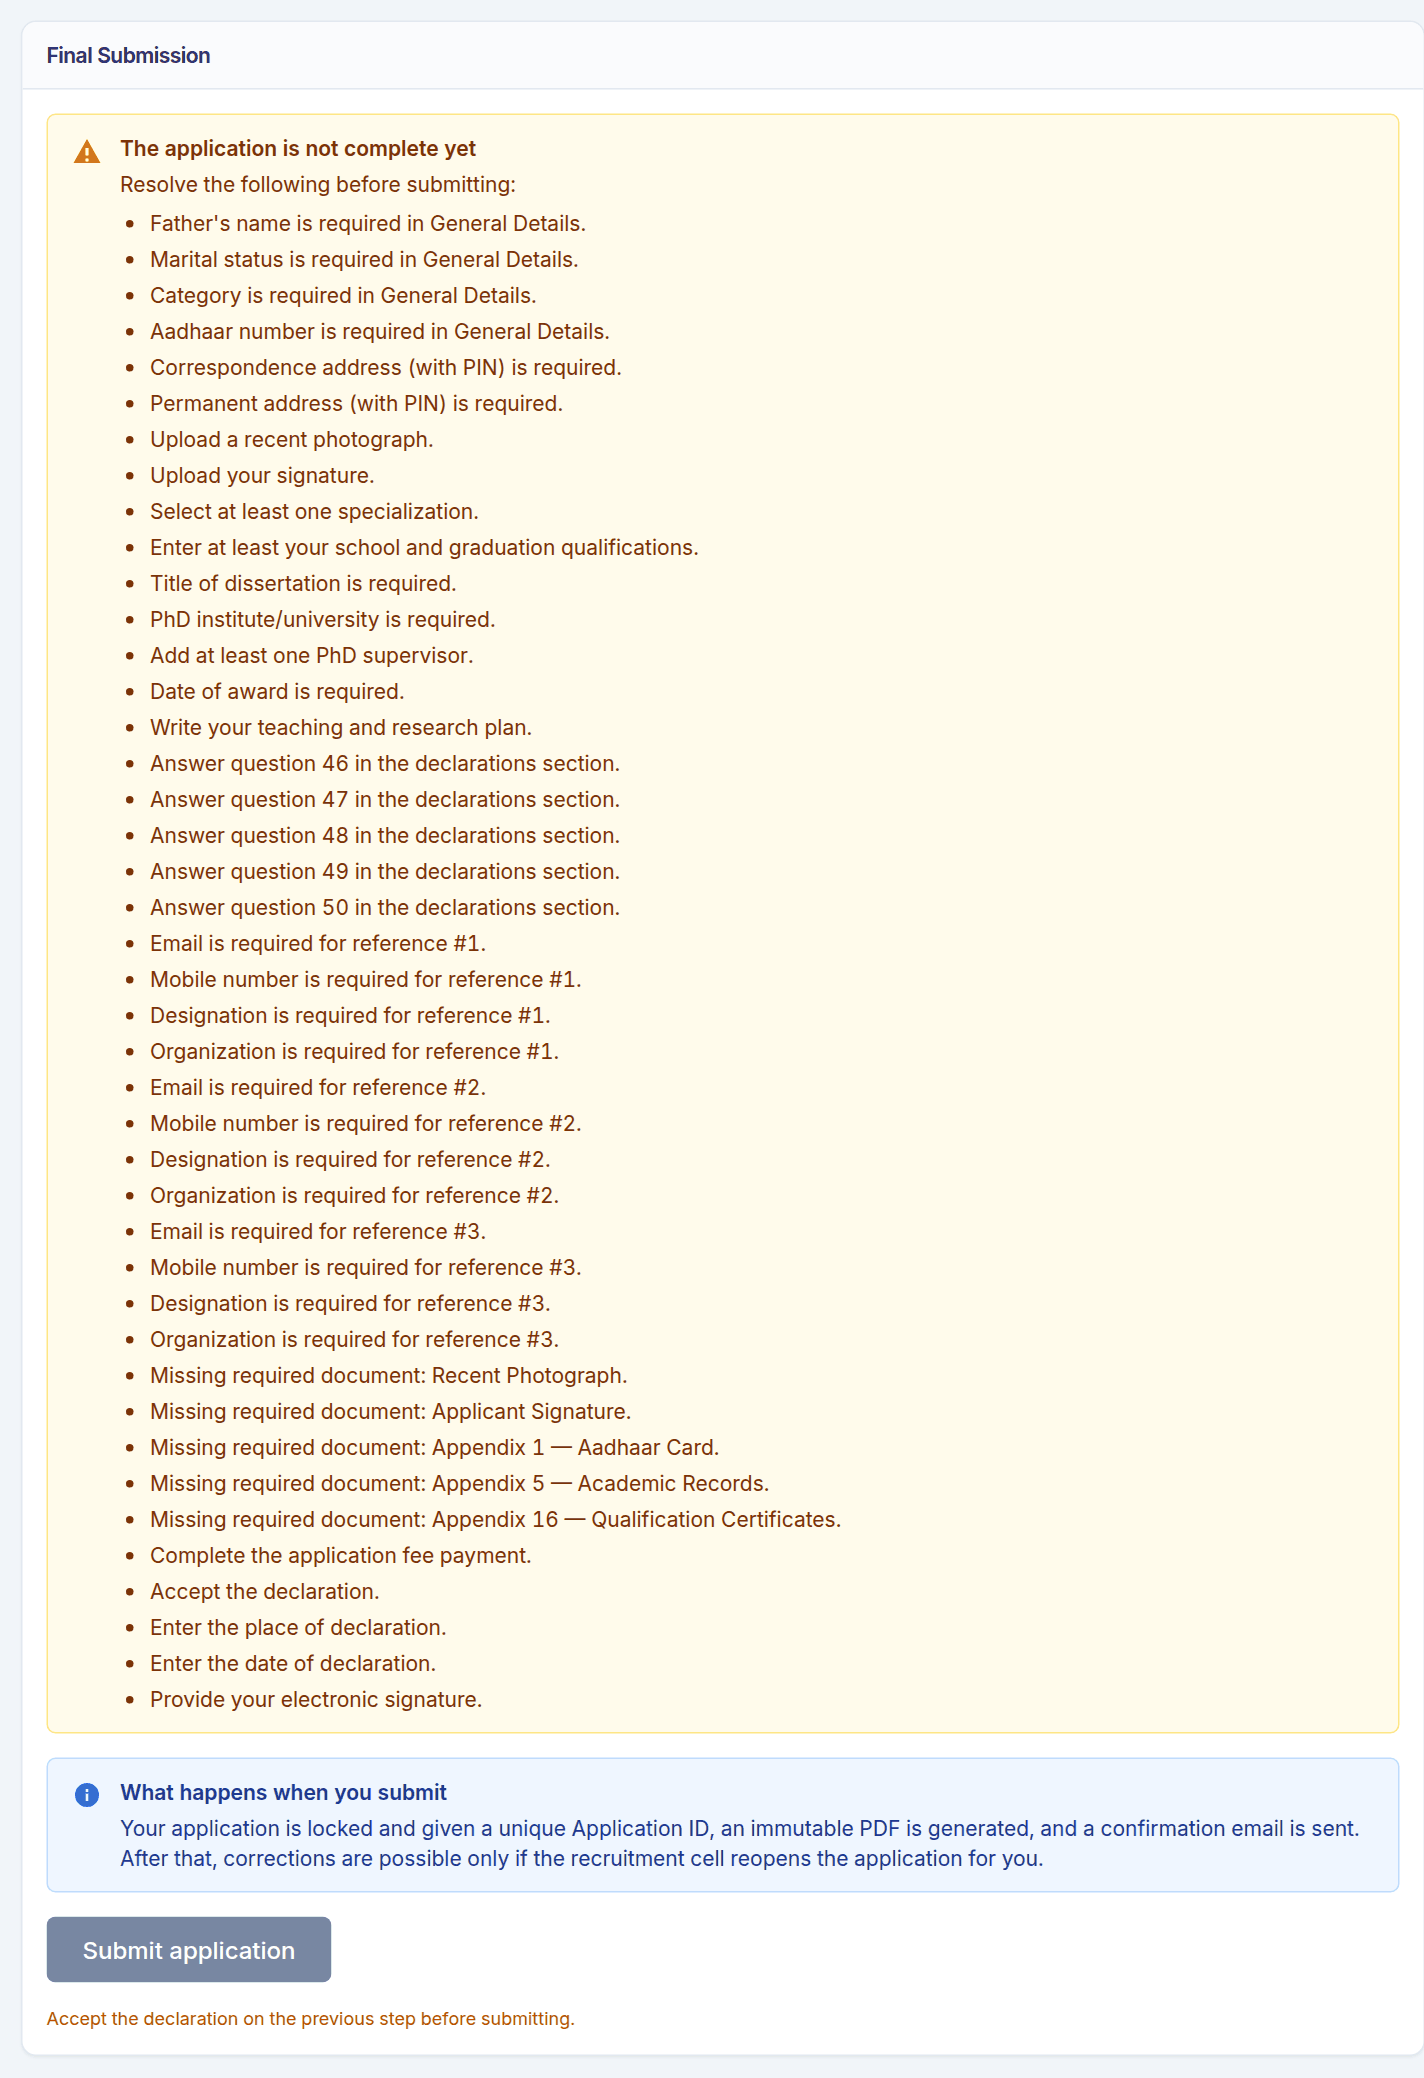
Work through the list and come back. When everything is in order, the Submit button becomes available.
Submitting is final. When you submit:
- Your application is given an Application ID. Quote it in any correspondence.
- A PDF of your application is generated and frozen. It will not change afterwards, even if you later edit your profile.
- The application can no longer be edited unless the recruitment cell reopens it.
18. After you submit
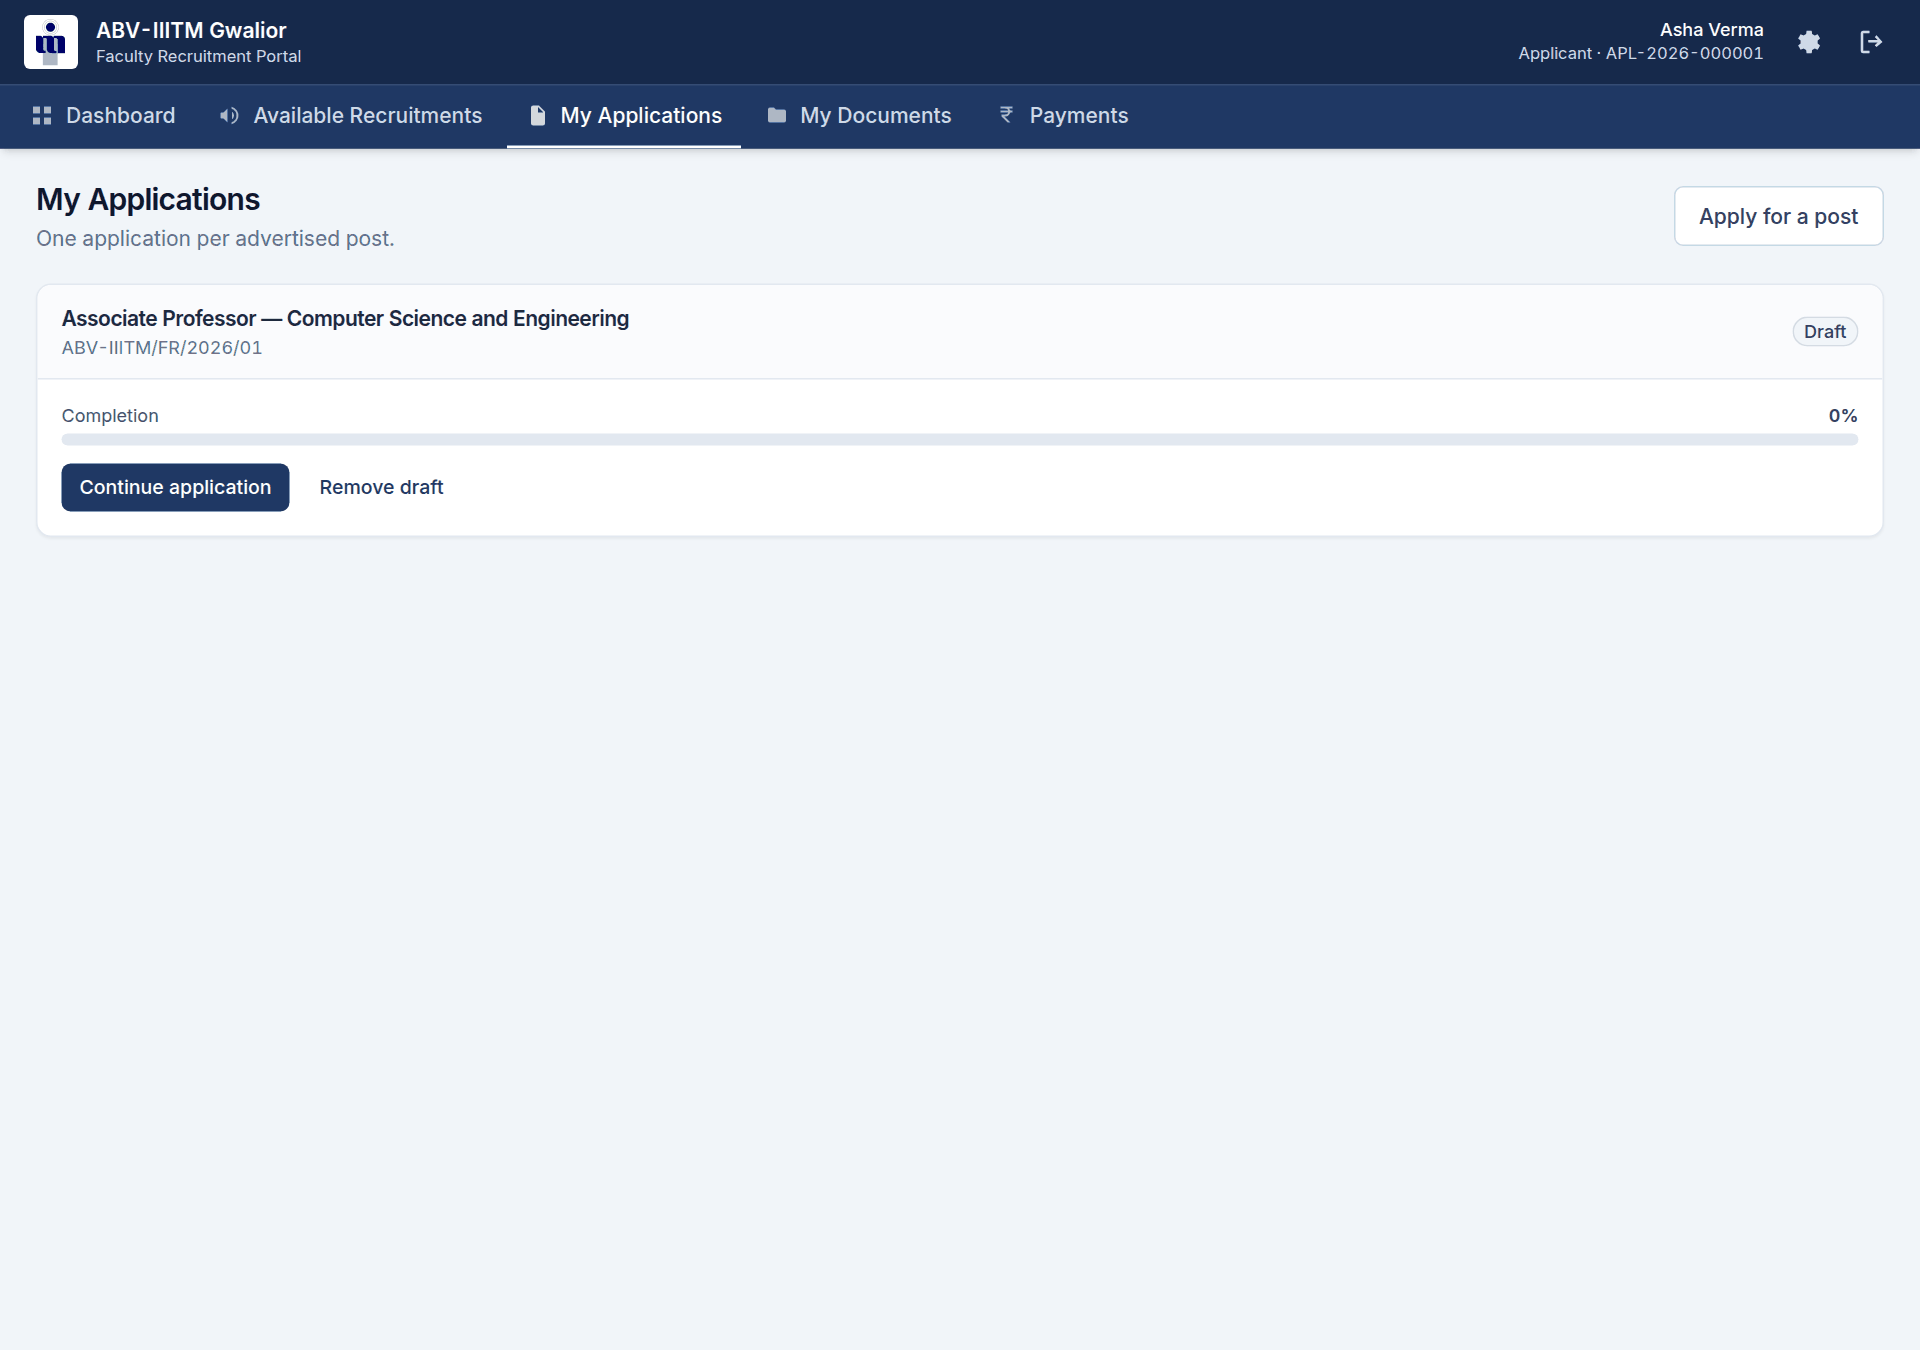
From here you can:
- Track the status of each application as it moves through scrutiny.
- Download your application PDF and your fee receipt.
- Answer a query. If the recruitment cell needs something clarified, it appears here and you are emailed. Open it, reply, and attach any document asked for. Please answer promptly — scrutiny cannot continue until you do.
You will be emailed when your application is received, when your payment is verified, when a query is raised, and when a decision is recorded.
↑ Back to top19. Using the portal on a phone
The portal works on a phone or tablet. The step list collapses to show the step you are on, with All steps to open the full list.
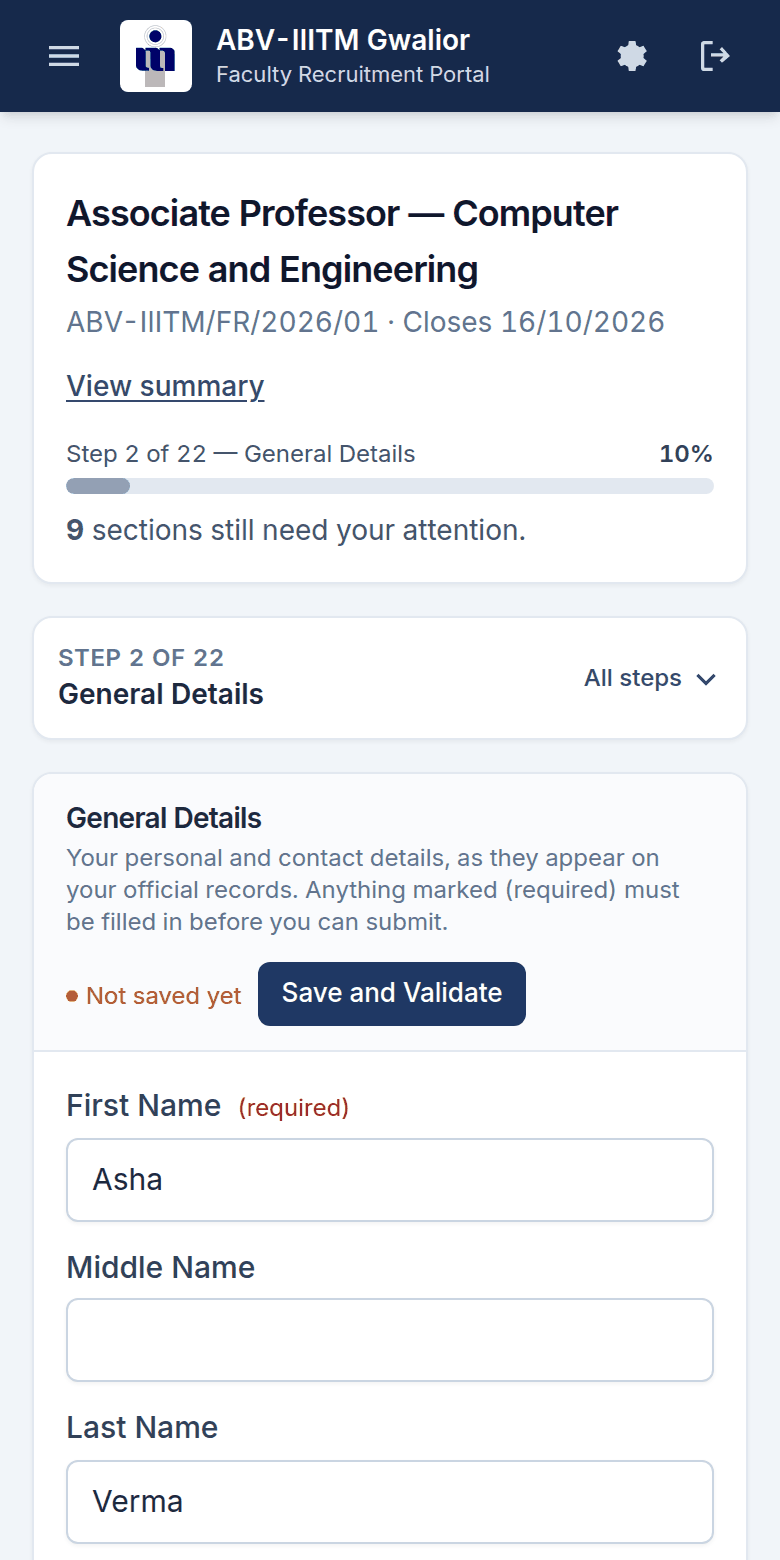
For the long sections — publications, employment — a computer is easier. Uploading photographs of your certificates from a phone works, provided each file is within the size limit stated on the upload control and the text is in focus.
↑ Back to top20. Common questions
Can I finish my application later?
Yes. Your work is saved as you go. Sign in again and choose Continue on your application.
I closed the tab without saving. Have I lost my work?
No. The portal saves what you have typed when you move away from a section or leave the form. If you close the tab with something unsaved, your browser asks you to confirm first.
A section does not apply to me. What do I do?
Leave it empty and carry on; the checklist marks it Not applicable. The exceptions are General Details, Academic Qualifications, PhD Details and the Disciplinary Declarations, which every applicant must complete.
My upload is refused as too large. What do I do?
Almost every upload is limited to 512 KB, and the photograph (300 KB) and signature (200 KB) are stricter. Each upload control states its own limit underneath. Re-scan the document in black and white at about 150–200 dpi, or compress the PDF, and try again. The limit is applied when the file is stored, so there is no way around it.
Why can I not submit yet?
Go to the last step. It lists everything still outstanding, with the step each item belongs to. The most common reasons are an unanswered declaration question, an incomplete PhD step, and a missing required document.
My fee still says “Awaiting Verification”. Am I stuck?
No. Once you have recorded your transaction details the fee step is complete and you can submit. Awaiting Verification means the recruitment cell has yet to reconcile your transfer against the bank statement, which usually takes a few working days. If it has been longer than a week, contact the recruitment cell with your transaction reference.
Do I have to fill in the PhD step?
Yes. PhD details are required of every applicant, and the application cannot be submitted without the dissertation title, the institute or university, at least one supervisor, and the date of award — unless you tick Degree awarded but certificate awaited, which removes the date requirement.
What goes in the “Attached at” column?
The page number at which that appendix appears in the set of documents you assemble. The portal deliberately leaves the column blank; you write the page numbers in yourself.
I made a mistake after submitting.
Contact the recruitment cell. They can reopen your application for correction; the reason is recorded and your earlier version is kept.
Can I apply for more than one post?
Yes. Each application is separate and filled in on its own. The fee applies to each.
Do I need to post hard copies?
Follow the instructions in the advertisement. The portal itself does not require them.
Who can see my documents?
Only the recruitment cell and the staff assigned to examine your application. Documents are stored privately, and every time one is opened it is recorded.
21. If you need help
Contact the recruitment cell at the address shown at the bottom of the portal’s navigation and on the sign-in page, and include:
- your Application ID, if you have one, or the email address you registered with;
- the post you are applying for;
- what you were doing when the problem happened.
For anything about eligibility, the advertisement or the selection process, contact the recruitment cell directly. This portal is for submitting your application; it does not decide eligibility.